Excerpt from our new blog: No work, no kneading, what’s not to like?

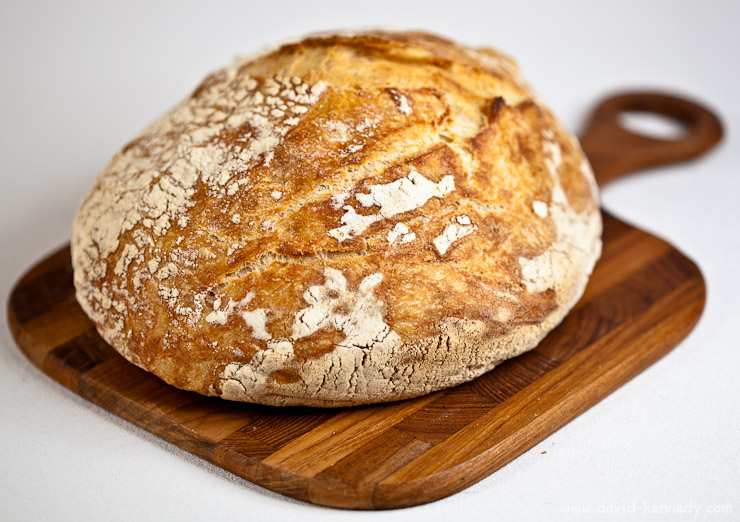
My third attempt at "No Knead Bread" yielded this beautiful, rustic boule.
My third attempt at “No Knead Bread” yielded this beautiful, rustic boule. | Canon 5D Mk. II and 100mm f/2.8 Macro lens | Exposed 1/100 sec. @ f/2.8, ISO 100 | 580EX II and 550EX Speedlites triggered with Canon ST-E2 Transmitter.

Our New Blog

Over the past couple of months, Elizabeth and I have been working on a project together: a combined cooking, gardening, and home improvement blog that we’ve named With One Cat in the Yard.  Today I posted about making Jim Lahey’s No-Knead Bread (aka No-Work Bread), which was popularized in a Mark Bittman column in The New York Times in 2006, and I thought I would cross-post it formy readers here.  Our new project is certainly not a photography blog–I’ve included the technical details for the photos in this post, but you won’t find them at With One Cat in the Yard–but I hope everyone will take a look.  More to come!

Flour, salt, yeast, water, and time perseverance

I’m in my third week of attempting to make good bread.  I’ve always enjoyed crusty bread, but I’ve never found the price of five dollars for a boule to be particularly attractive, so I rarely buy it.

Elizabeth suggested trying a recipe that inspired many food bloggers a few years ago: Jim Lahey’s “No Knead Bread” featured in Mark Bittman’s column in The New York Times.  The recipe became so popular that publishers perceived a demand for a book, so Lahey wrote My Bread: The Revolutionary No-Work, No-Knead Method to further explain his method and offer variations. Both Lahey and Bittman emphasize that the process is so simple that a child could make it happen, although I don’t think my mom ever would have trusted me to drop dough into a 450° F stock pot and put it back inside an oven.  Sometimes I wonder why anyone would trust me to do that now.

The wet, sticky dough after its first rise (overnight).
The wet, sticky dough after its first rise (overnight). | Canon 5D Mk. II and 100mm f/2.8 Macro lens | Exposed 1/200 sec. @ f/11, ISO 100 | Canon 550EX Speedite triggered with 580EX II Speedlite on “Master.”

My first effort was not completely successful, nor was my second, but the third was just right.  I was skeptical that I could make a loaf of bread worthy of an artisan bakery, but lo and behold, it’s not only possible, but has quickly become one of my new favorite breads.  Not only does it look amazing and have a satisfying, crackling crust, it’s also pretty tasty.  Now, it’s not the best, most flavorful bread ever, but it does have a faint sourdough flavor of which I am quite fond (on account of the lengthy fermentation period) and it’s fantastic for dipping in soup, olive oil, or as sandwich bread.

The basic recipe is stunningly simple: three cups of bread flour, one and a half cuts of water, one and a quarter teaspoon of salt, and a quarter teaspoon of yeast are briskly mixed together in a bowl and then left alone overnight: at least 12 hours, but extra time does seem to yield better results.  While the original recipe calls for 1 and 5/8 cups of water, the video on the Web site and also the recipes I found on several other blogs all called for one and a half cups, and indeed that seemed to work well.  After the lengthy first rise, the dough is rolled into a ball, allowed to rise again, and then baked in a pot inside of a conventional oven at 450° F.  This creates a “fake oven,” as Lahey refers to it in the aforementioned video, meaning that it simulates the steam-injected ovens found in professional bakeries.  The moisture of the dough is trapped within the pot and circulates throughout, ensuring a crisp crust.

Note: the recipes I follow are at the end of the post!

No Knead Bread in a cast iron Dutch oven
No Knead Bread in a cast iron Dutch oven. | Canon 5D Mk. II and Zeiss 85mm f/1.4 ZE Planar T* lens | Exposed 1/40 sec. @ f/2, ISO 1600.

For my first few loaves I used Elizabeth’s hard-anodized, eight-quart stock pot.  The current thinking is that anywhere from three to five quarts is just about “right” for No Knead Bread.  (The original recipe called for a six to eight quart pot.)  Combined with our concern that such high temperatures for an hour and fifteen minutes might deteriorate the non-stick coating, I purchased a Lodge five-quart cast iron Dutch oven on Amazon.

However, the sticking point to this bread–literally–is not the equipment needed, but the second rise of the dough.  After a few attempts, I believe I’ve found an effective alternative to the original recipe.  I offer you my experiences with this bread so that you can learn from my mistakes and quickly get to the point: great bread at a great price with relatively little effort.
Post continues at With One Cat in the Yard!

Well, it’s about time: A Canon 200-400mm lens

Updated with thoughts about teleconverters and existing lenses…
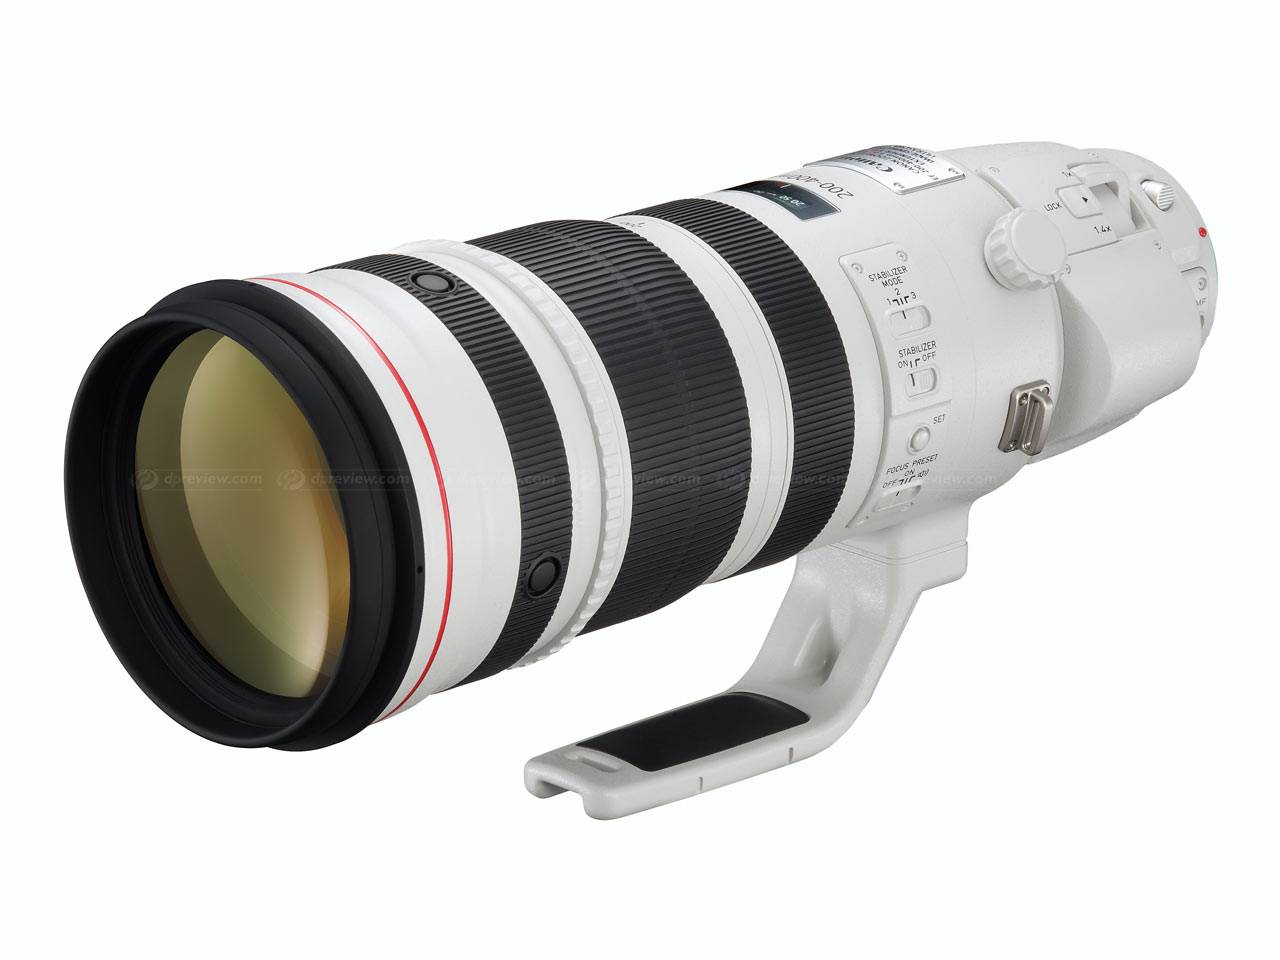
Canon 200-400mm f/4L IS Lens with built-in 1.4x TC
Canon 200-400mm f/4L IS Lens with built-in 1.4x TC | Photo from dpreview.com

I don’t have to think about switching to Nikon any more?

For years now Nikon has had one lens that makes nature photographers who use any other brand salivate: the Nikkor 200-400 f/4 VR lens.  Well, evidently Canon listened to all the complaints–or realized they could make a killing–and they have come up with their own 200-400 with an interesting trick up its sleeve: a built-in 1.4x teleconverter (I imagine that explains the “hump” on the side of the lens barrel).

No word on what size hole it will leave in your wallet, but it is supposedly shipping this year.  Canon made a similar announcement last fall for the development of new 500mm and 600mm lenses, and today Canon has released weights for each (both reduced, the 600mm dramatically so compared to the original 60mm f/4L IS).  However, it’s the 200-400 that really has my attention.  I’ll try to get on the list at CPS to test one as soon as they start shipping.

To my mind, the biggest question is will this new lens accept teleconverters?  Sure, it has a 1.4x built in, but can you put a 2x teleconverter on it so it becomes a 400-800mm f/8?  Or stack another 1.4x with the internal teleconverter engaged to have a similar 392-784mm f/8 range?  (I mention the latter option because it’s at least possible the image quality would be higher.)

Whither the DO?

At present, the longest lens I own is the 400mm f/4 DO IS.  It’s light-weight, extremely compact, and with a little toning the images that it produces are stellar.  The lens remains sharp with a 1.4x TC (560mm f/5.6) and with proper technique I’ve made good images with the 2x teleconverter (800mm f/8).  Hell, I’ve even stacked teleconverters, although the quality declines noticably at that point.  When I heard about the 200-400mm f/4, the first question that popped into my head was whether this would be the lens that replaces the 400mm DO.  If it can accept teleconverts, I’d hedge my bet that the answer is “probably.”

But for those who simply want a walk-about zoom lens, there’s already a surprisingly good alternative to the 400mm DO, albeit a stop slower.  Last fall, Artie Morris began posting about using the new 70-200mm f/2.8L IS Mk. II with the 2x teleconverter to make a 140-400mm f/5.6 zoom, and I tested the combination myself and was duly impressed.

For a lot of wildlife photography, the new 70-200mm with a 2x, combined with a standard telephoto (400mm, 500mm, 600mm, etc.) will pretty much “do it all.”  Does that mean that a dedicated 200-400mm zoom is even necessary anymore–that Canon missed its window of opportunity?  Alternatively, are the 400mm DO’s days are over?  Only a side-by-side comparison of all three will do.

Canon Press Release

LAKE SUCCESS, N.Y., February 7, 2011 – Canon Inc. today announced the development of a new super-telephoto lens, the EF 200-400mm f/4L IS USM EXTENDER l.4x, for use with all EOS SLR cameras. A prototype of the new lens will be exhibited at the CP+ tradeshow, held in Pacifico Yokohama, from February 9 – 12, 2011.

The EF 200-400mm f/4L IS USM EXTENDER l.4x is being developed as an L-series super-telephoto lens with an integrated 1.4x extender and high-performance Image Stabilizer technology. The new lens will offer exceptional flexibility by incorporating a built-in 1.4x extender that increases the maximum focal length to 560mm for sports and wildlife photography. High-quality images with high levels of resolution and contrast will be possible through the use of advanced optical materials such as fluorite crystal. The new lens will also include dust- and water-resistant construction designed for extended usage under harsh conditions.

Canon will continue to respond to the needs of various users ranging from beginners and advanced amateurs to professional photographers, in an effort to enrich their photographic expression with SLR cameras by continuing to develop attractive new lenses with improved optical technology.

(press release from the Canon USA Web site)

A good change, but is it worth the price?

Mode dial lock
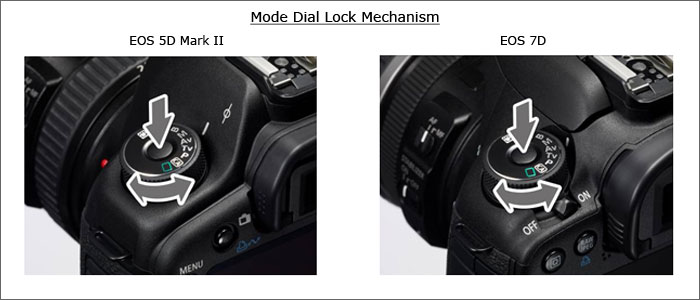
Mode dial lock modification - image from usa.canon.com

What?

Canon is now offering to modify 5D Mark II and 7D camera bodies with a mode dial that locks in place to prevent the dial from moving accidentally.  Unfortunately, it’s not free of charge: $100 per camera body.

Why?

You know the frustration: you’ve set your camera to “aperture priority” and then you sling it over your shoulder.  You pick it back up to make a quick image and suddenly the viewfinder blacks out far longer than you expected.  A second-long exposure in bright daylight?  “Oh, ” you realize, “it slipped over to shutter priority which was set for making blurs.”  But the decisive moment?  It’s long since gone on account of a technical problem.

I’m going to make a broad-spectrum criticism here: the mode dials on pretty much every camera suck because most of them do not lock in any way, shape, or form.  Nikon locks the “sub-dial” beneath the mode dial on many of their bodies, but even they are not blameless.

Time to celebrate?

Maybe.  I own both bodies, and I’m not really thrilled at the thought of contributing $200 into Canon’s coffers for something that is really a fix, not a “modification.”  And I’m disappointed that there’s no suggestion that a locking mode dial will be a standard feature of future camera bodies.  Finally, a mod for the 5D Mk. II really gives me pause: this camera was announced over two years ago, so shouldn’t owners be looking for its replacement, not pouring more money into the existing body?

I think this one is worthy of discussion, so what do you think?

Another option for focus calibration: LensAlign MkII

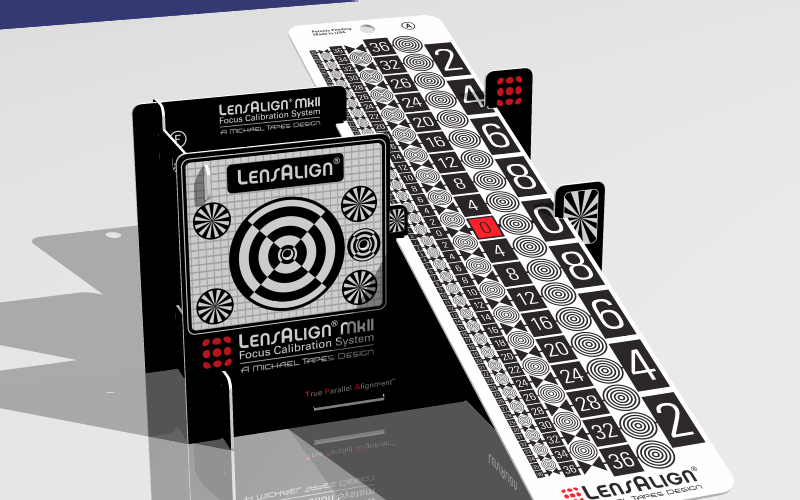
LensAlign MkII rendering
LensAlign MkII rendering courtesy RawWorkflow/Michael Tapes

Michael Tapes, the entrepreneur who invented the “LensAlign Focus Calibration System” e-mailed me a few weeks back and said that he had a new product coming, but by reading the information I was under a NDA.  However, many of the details of the LensAlign MkII, which replaces the LensAlign Lite (I reviewed the LensAlign Pro earlier this fall), are available on Michael’s blog.  I just received a prototype yesterday, and will be writing a review of the new product and comparing it to its “bigger brother.”  Final production versions will retail for $79.95 and will ship in the United States for $6 as it comes flat/disassembled to fit inside of a Priority Mail envelope.  This conceivably means that it can be taken apart easily for travel, something the LensAlign Pro simply cannot do.

Stay tuned for more!

So long, and thanks for all the fish

Calin Ilea diptych
Calin Ilea diptych - 3 October 2008, just after participating in the Missouri Photo Workshop in St. James, Mo., left, and 1 October 2010, on the second-to-last day of co-coordinating the Missouri Photo Workshop in Macon, Mo., right.

Today, a Romanian Fulbright student at the University of Missouri School of Journalism will defend his project to his committee to earn his M.A. in journalism.  When I met Calin Ilea two years, ago, I had no clue our friendship would change the way I approach photography.  He’s headed home on Thursday, but I can’t be in Missouri today to celebrate the (likely) completion of his project with him.  Are rain checks good in Romania, Calin?

Datacolor: Immitation is the sincerest form of flattery

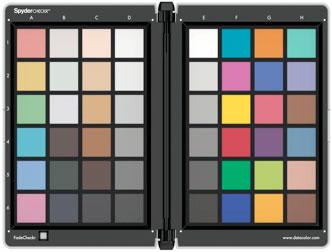
Datacolor SpyderChekr

Earlier in the month, Datacolor announced the SpyderLensCal, a product that was a clear imitation of the LensAlign autofocus microadjustment calibration tool from RawWorkflow.  Although it would be unfair to dismiss it outright as I’ve not actually worked with one, SpyderLensCal has several shortcomings compared to the LensAlign, including the inability to confirm that it is parallel to the camera.

Now, Datacolor has announced another product that seems to be an homage to a competitor: the SpyderChekr is aimed squarely at X-Rite’s ColorChecker Passport that I reviewed early this year.  The gestalt of the two products is the same: a plate of pigmented squares with known color values is embedded into a hinged case to be carried on location and photographed under the lighting conditions for the photo shoot.  Then, in RAW conversion either in Adobe Camera RAW or Adobe Lightroom, the photo of the unit is exported to the manufacturer’s software to be profiled.  That profile is then applied, at the user’s discretion, to the photos from the shoot.

However, there appears to be a fundamental difference in the way that Datacolor approached the SpyderCheckr compared to the SpyderLensCal: price point.  The SpyderLensCal is priced to undercut what has been the only game in town, the LensAlign, and to do so by $20 at an MSRP of $59.00.  To get down to that price, Datacolor clearly cut corners.  The SpyderCheckr, on the other hand, has been announced at $129.00, a full $30.00 more than the X-Rite product, and actually builds upon the idea of camera calibration by adding some interesting features.

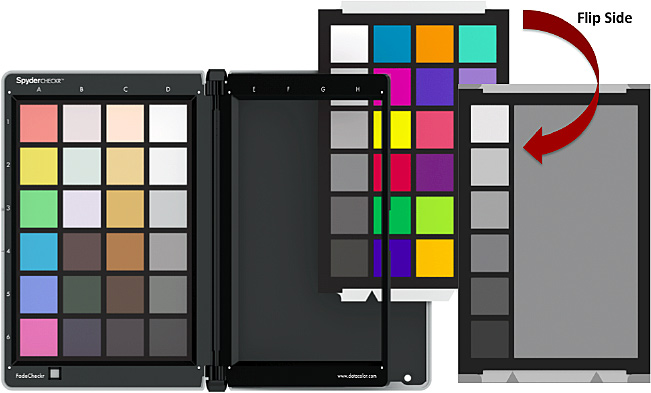
The Datacolor product can be mounted on a tripod, whereas X-Rite’s hinged case was designed to support the color charts, like the fold-out arm in a picture frame.  A tripod thread adds versatility.  The color charts in Datacolor’s SpyderCheckr can be flipped over to reveal gray-balance targets.  That means that one could photograph the necessary color chart for camera calibration and a greay-balance target in the same frame.  X-Rite’s passport does include a gray-balance target, but it is mounted opposite the color charts, so they could never be together in the same photograph.

SpyderChekr's reversible charts

Furthermore, that Datacolor’s color charts are reversible means that they are also user-replaceable should they begin to fade or become scratched.  The Datacolor Web site for the SpyderCheckr suggests that these spare color charts will be available for sale “early in 2011.”

There are some differences between the SpyderChekr and the ColorChecker Passport that do not make one superior to the other, but are of interest just the same.  First of all, the Datacolor product is physically larger.  In fact, I believe it is close to the size of a traditional Gretag-Macbeth (now X-Rite) color chart.  This means that it won’t fit in a camera bag quite as easily.  Even when I’m not working on a studio shoot, I always carry the X-Rite product in my bag, because it is small and easy to hand-hold.  However, I can’t mount it to a tripod (or light stand), so that may be irrelevant for some.   Another difference is that X-Rite’s ColorChecker Passport creates DNG profiles for its camera calibration, whereas Datacolor’s software manipulates the Hue/Saturation/Lightness sliders in Adobe Camera RAW / Adobe Lightroom.  I’m inclined to believe that DNG profiles may be a better route, but I’m not a technical expert on this particular part of Camera RAW / Lightroom, so I will just offer that they are different routes to achieve the same objective: more faithful color.

Many of the design and operational differences between the two products are actually outlined in a chart on page six of Datacolor’s SpyderCheckr manual, although you’ll notice a natural bias for their own product!

Finally, if you’d like to watch a video explaining the features and the supporting software for Datacolor’s SpyderChekr, you can watch this PhotokinaTV’s video featuring David Tobie, product technology manager for Datacolor:

Datacolor announces product similar to LensAlign

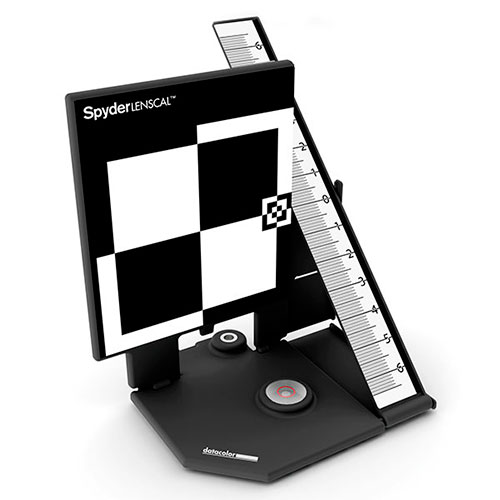
Datacolor SpyderLensCal
Datacolor SpyderLensCal - image from datacolor.com

Have I seen this before?

Yesterday, Datacolor announced a new addition to its “Spyder” line of calibration tools: the Spyder LensCal.  In many ways, it’s a spitting image of the LensAlign Pro I briefly reviewed here earlier this summer, and significantly less expensive at a suggested price of $59.00 (the LensAlign Pro sells for $180, while lensAlign Lite goes for $80).

While the design of the two systems is uncannily similar–an autofocus target with a ruler to the right–there is a significant difference between them: I see no way to confirm that the camera and the focus target are perfectly square to one another with the SpyderLensCal.  This is a significant advantage for the LensAlign, and in fact begs the question of just how accurate the Datacolor product could be if it is not feasible to make the target and camera square.  If they are skewed, so too will the out-of-focus areas, and the reliability of the product comes into question.

Furthermore, the SpyderLensCal offers no advice about the distance that should separate the camera from the target (only that it be “a fixed distance”), nor do they offer any clues about how much depth of field should be expected to be in front or fall behind the “0” point of the ruler.  (While the depth of field for many lenses is pretty much 49% in front of where you focus, and 51% behind it, with extremely wide focal lengths, such as 16mm, the depth-of-field shifts to become 40% in front and 60% behind the point of focus.)  I can already envision many of Datacolor’s customers having to rely upon LensAlign’s Web site for their online “Distance Tool.”

Of course, it will be interesting to see how these models really stack up once they can be compared side-by-side.  The SpyderLensCal will begin shipping in about three weeks, during Photokina.

Photokina is coming…can you tell?

Every two years, camera manufacturers descend upon Cologne, Germany to push their latest wares. In the past week, on the lead-up to the trade show, Nikon, Sony, and Canon (in that order) have unveiled their latest offerings.

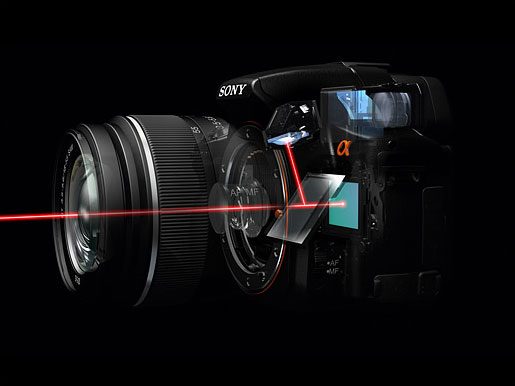
The Sony pellicle mirror diverts 30% of the incoming light to a phase-detect autofocus sensor. Image from DPReview.com.

The more interesting announcements, to my mind, include Sony’s decision to revive the Pellicle mirror concept in the form of a “Single Lens Translucent” body that is always in live view, but retains phase-detect autofocus even for video.

Canon has announced a new 60D body that loses many of the features that it’s predecessor, the 50D, had but it gains video and an articulated LCD screen.  I can only hope that articulated screens are found on every future body that shoots video…Note also that this camera has another edge over the higher-priced 7D: manual audio control.  Canon has yet to release firmware to give the 7D the capability to control the audio level, but this lower-priced model might actually become very attractive to videographers for the articulated screen combined with audio control.  That is, if Sony doesn’t steal the show.

However, Canon didn’t end there: the 300mm f/2.8L, 400mm f/2.8L, and 1.4x and 2x teleconverters have all been refreshed with new optical designs.  The updated teleconverters have improved electronics that might only affect their performance with the newly-announced telephoto lenses, but the improved optics should benefit all telephoto lenses.  So, while I can’t say that any of the super-telephoto lenses are in the cards for me at the moment (the longest lens I have is the 400mm f/4 DO IS, and my sights are set on the 800 f/5.6–some day) the new teleconverters are sure to pique the interest of everyone as they are a frequently-used accessory and are therefore an easy way of improving the image quality of one’s photographs.

Also, Canon announced that they will be redesigning the 500mm f/4L IS and 600mm f/4L IS super-telephoto lenses, complete with the new “flourine coatings” on the aforementioned lenses and teleconverters.

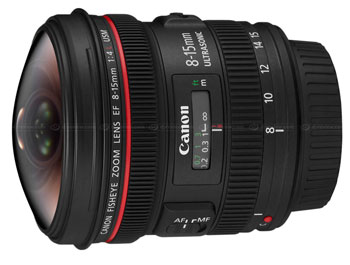
Canon 8-15mm f/4L fisheye zoom lens.  Image from DPReview.com.
Canon 8-15mm f/4L fisheye zoom lens. Image from DPReview.com.

That said, the icing on the cake of the announcements?  An 8-15mm fisheye zoom.  Sure to be of interest to a lot of people for the creative perspectives offered in such a range.  Particularly, owners of reduced frame (APS-C and APS-H) cameras will be interested in this lens for the wider perspective.

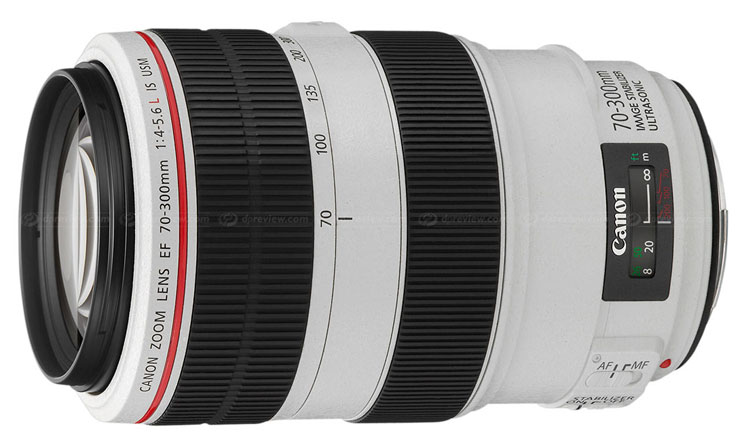
Really, the only offering in that mix that doesn’t make sense to me is the 70-300mm f/4-5.6L zoom lens.  I know that the 70-300 range is popular, but how this lens fits on the totem pole in relation to the 70-300 f/4.5-5.6 DO IS lens is something of a mystery to me.

I was curious enough about this “L” version of the popular zoom range that I fired off an e-mail to Scott Andrews, the photojournalism representative for Canon in North Carolina, and his estimate is that this lens will have greater contrast and sharpness as compared to the DO lens.  It is, however, heavier at 2.3 pounds versus 1.6 pounds, bright white as opposed to matte black, and will be priced some $200 more than its DO sibling.  I do wonder if this is Canon’s way of tiding people over while we all wait for an update of the 100-400mm zoom…provided it’s even coming.

Canon 70-300mm f/4-5.6L zoom lens.  Image from DPReview.com.
Canon 70-300mm f/4-5.6L zoom lens. Image from DPReview.com.

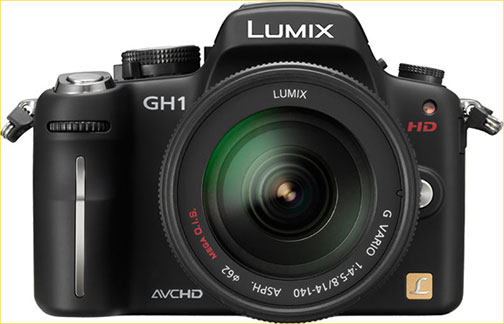
Hacked firmware for Panasonic GH1

Panasonic Lumix GH1
Panasonic Lumix GH1

Of video and dSLR’s

One of the curious things that I noticed over the last year and a half at the University of Missouri–at least among the photojournalism students–was a rabid fascination with video from the Canon 5D Mark II.  I was one of the first ones in the program to actually buy one (August Kryger beat me by about a week and a half) in December 2009.

Other cameras sprang up that could do video, but people in the program seemed to wear blinders and were obsessed exclusively with 5D II video even though they did not even own a Canon camera or lens.

I say that this is frustrating because I know from first-hand experience that the 5D and the 7D are both very frustrating to use as video cameras, even though the resulting video looks great.  But for every second of good footage I’ve recorded, I’ve lost at least a minute of good material because of all of the physical limitations of using a dSLR for video: framing is a bit of a pain, autofocus is slow, setting up the exposure is also slow, daylight makes it hard to see the rear screen, and you can’t hand-hold it to save your life.  Despite these flaws, I believe that Canon and Nikon have been overly effective at making people believe that they are the only game in town.  Perhaps Olympus is a distant third.  This culture of ignorance of anything that is not Nikon or Canon appears to persist among those who should know better.

Continue reading “Hacked firmware for Panasonic GH1”

Lightroom 3 on its way!

Adobe Lightroom 3Lightroom 3.0 is on its way after a long beta-testing period.  Ian Lyons has broken down the new features quite well on his Web site.

One of the more interesting changes is that Adobe has re-engineered its RAW processing engine to the point that it isn’t exactly backwards compatible.  Photos processed in past versions of Lightroom or Adobe Camera RAW will be labeled “Process Version 2003” (the year that Camera RAW became a standard feature in Photoshop).  Photos processed in the new version will have “Process Version 2010” appended to them.

The difference?  Supposedly, the noise reduction and sharpening tools have been improved dramatically.  The change in the way RAW files are converted to TIFF, JPEG, etc. is supposed to yield a greater quality image as well.

One of the other changes to Lightroom is support for DSLR video files, although my understanding is that the implementation is rudimentary.  You cannot play back a video file within Lightroom–it launches your preferred video viewer (Quicktime, Windows Media Play, etc.).  What I do not know yet is whether there is at least some ability to put video files inside of Collections to keep them organized.  I would certainly hope that this functionality was not overlooked.

I did not participate in the Beta program because I simply didn’t have the time as I was enrolled in classes at the University of Missouri School of Journalism, but now that I am working on my final project I have a more flexible schedule, and am looking forward to the changes in Lightroom.

The upgrade for users of Lightroom is only $99.00 at Amazon; the full version is $299.