Earlier in the month, Datacolor announced the SpyderLensCal, a product that was a clear imitation of the LensAlign autofocus microadjustment calibration tool from RawWorkflow. Although it would be unfair to dismiss it outright as I’ve not actually worked with one, SpyderLensCal has several shortcomings compared to the LensAlign, including the inability to confirm that it is parallel to the camera.
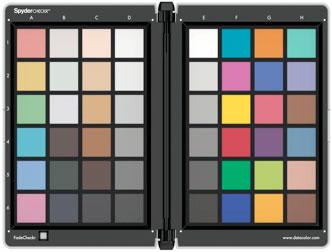
Now, Datacolor has announced another product that seems to be an homage to a competitor: the SpyderChekr is aimed squarely at X-Rite’s ColorChecker Passport that I reviewed early this year. The gestalt of the two products is the same: a plate of pigmented squares with known color values is embedded into a hinged case to be carried on location and photographed under the lighting conditions for the photo shoot. Then, in RAW conversion either in Adobe Camera RAW or Adobe Lightroom, the photo of the unit is exported to the manufacturer’s software to be profiled. That profile is then applied, at the user’s discretion, to the photos from the shoot.
However, there appears to be a fundamental difference in the way that Datacolor approached the SpyderCheckr compared to the SpyderLensCal: price point. The SpyderLensCal is priced to undercut what has been the only game in town, the LensAlign, and to do so by $20 at an MSRP of $59.00. To get down to that price, Datacolor clearly cut corners. The SpyderCheckr, on the other hand, has been announced at $129.00, a full $30.00 more than the X-Rite product, and actually builds upon the idea of camera calibration by adding some interesting features.
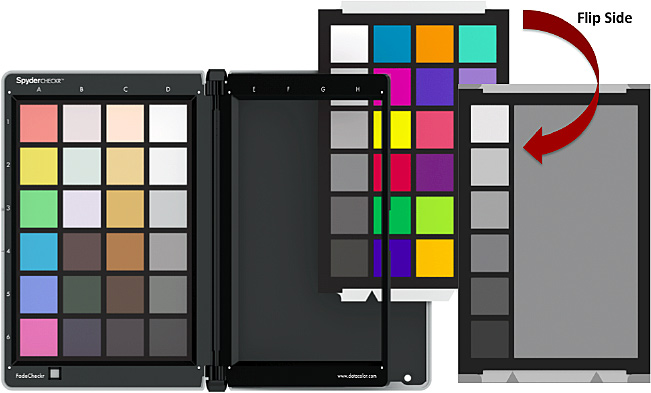
The Datacolor product can be mounted on a tripod, whereas X-Rite’s hinged case was designed to support the color charts, like the fold-out arm in a picture frame. A tripod thread adds versatility. The color charts in Datacolor’s SpyderCheckr can be flipped over to reveal gray-balance targets. That means that one could photograph the necessary color chart for camera calibration and a greay-balance target in the same frame. X-Rite’s passport does include a gray-balance target, but it is mounted opposite the color charts, so they could never be together in the same photograph.

Furthermore, that Datacolor’s color charts are reversible means that they are also user-replaceable should they begin to fade or become scratched. The Datacolor Web site for the SpyderCheckr suggests that these spare color charts will be available for sale “early in 2011.”
There are some differences between the SpyderChekr and the ColorChecker Passport that do not make one superior to the other, but are of interest just the same. First of all, the Datacolor product is physically larger. In fact, I believe it is close to the size of a traditional Gretag-Macbeth (now X-Rite) color chart. This means that it won’t fit in a camera bag quite as easily. Even when I’m not working on a studio shoot, I always carry the X-Rite product in my bag, because it is small and easy to hand-hold. However, I can’t mount it to a tripod (or light stand), so that may be irrelevant for some. Another difference is that X-Rite’s ColorChecker Passport creates DNG profiles for its camera calibration, whereas Datacolor’s software manipulates the Hue/Saturation/Lightness sliders in Adobe Camera RAW / Adobe Lightroom. I’m inclined to believe that DNG profiles may be a better route, but I’m not a technical expert on this particular part of Camera RAW / Lightroom, so I will just offer that they are different routes to achieve the same objective: more faithful color.
Many of the design and operational differences between the two products are actually outlined in a chart on page six of Datacolor’s SpyderCheckr manual, although you’ll notice a natural bias for their own product!
Finally, if you’d like to watch a video explaining the features and the supporting software for Datacolor’s SpyderChekr, you can watch this PhotokinaTV’s video featuring David Tobie, product technology manager for Datacolor:
