While I have been active as a photographer in the Raleigh-Durham area for several years, I’ve allowed this blog to languish. I’ve jotted down several ideas over the years, but few have turned into writing. I’m keenly aware that in the interim, YouTube has become one of the dominant forces in communicating ideas. And I may begin creating content for that platform, but first I had to actually sit down and write something that wasn’t just another e-mail, quote for a job, or some other administrative task that all too often becomes the “main” reason for sitting in front of a screen. Sure, editing through photos happens, too, in-between sessions with Quickbooks! Also, life happens.
I can be a very technical photographer. I like to know about the latest tools. Some call what I do “gear acquisition syndrome” however I am also fanatic about selling gear that hasn’t worked for me / I no longer use to friends, on Craigslist, and on eBay. This is something I began to write in September 2018. More than a year later, I think there are things that will help those trying to make decisions regarding the equipment they will take them on their own paths forward. Spoiler alert: I switched to Sony in March 2019. Furthermore, I do use affiliate links to certain gear. If you find my articles helpful, please consider making purchases via these links.
My greatest fault, and my strength, is that I am a passionate generalist. It’s a very expensive career path to be equipped for nature photography (wildlife and landscape), travel photography, wedding and event photography, studio portrait photography, and studio-on-location photography. It’s a tangled web, and it has made some of my equipment choices really difficult. Oh, and I did I mention I’ve shot Canon since the age of 10? I’m heavily invested in that system and currently debating abandoning some of these tools in favor of different ones. While I never spoke formal vows, the idea of leaving behind the system that ushered me into this crazy world of image-making feels like a trial separation that could lead to divorce all the same.
Alaskan coastal brown bear at Lake Clark National Park. Canon 1DX and 400mm DO IS with 2X III extender
I’ve recently changed my primary computer from a Thinkpad W520 to a Dell Latitude E5470. I wanted to retain the quad core Intel processing that I had grown accustomed to, as well as the ability to have 32gb RAM, but the 6 pound laptop with the one pound power adapter was getting to me: I needed to downsize. I sacrificed an inch of screen real estate, the built-in Huey colorimeter, and the classic style keyboard. But, I also ditched three pounds. And by purchasing in the Dell outlet, I spent half what I did in 2011. In the end, I’d call that a win.
Over the last few years, Intel has been developing Wireless Gigabit (WiGig) cards and receivers that manufacturers like Dell, HP, and Lenovo have implemented to create “wireless docking” for laptops. The only thing that isn’t wireless is charging: you still need to plug in the laptop for that. But, the laptop wouldn’t necessarily have to be on my desk to connect to the dock, and that frees up space in my cluttered world. So, I thought I would give it a try. And the short of it is that it works. My Drobo and other USB 3 hard drives were connected to the dock, along with my monitors, and I figured I was set. The long of it is that I can’t get my monitor to calibrate and profile correctly using the dock. A monitor connected to a WiGig dock does not simply pass through to the laptop the way that it would on a mechanical dock: it appears to influence the way colors are displayed.
First, for reference, this is the equipment and software versions I have:
Latitude E5470 running Windows 10 Pro
Dell WLD 15 Wigig Dock
Intel Wireless Dock Manager v. 2.6.0.90
Intel Tri-Band 18260
Intel Proset drivers v. 19.0.1621.3340
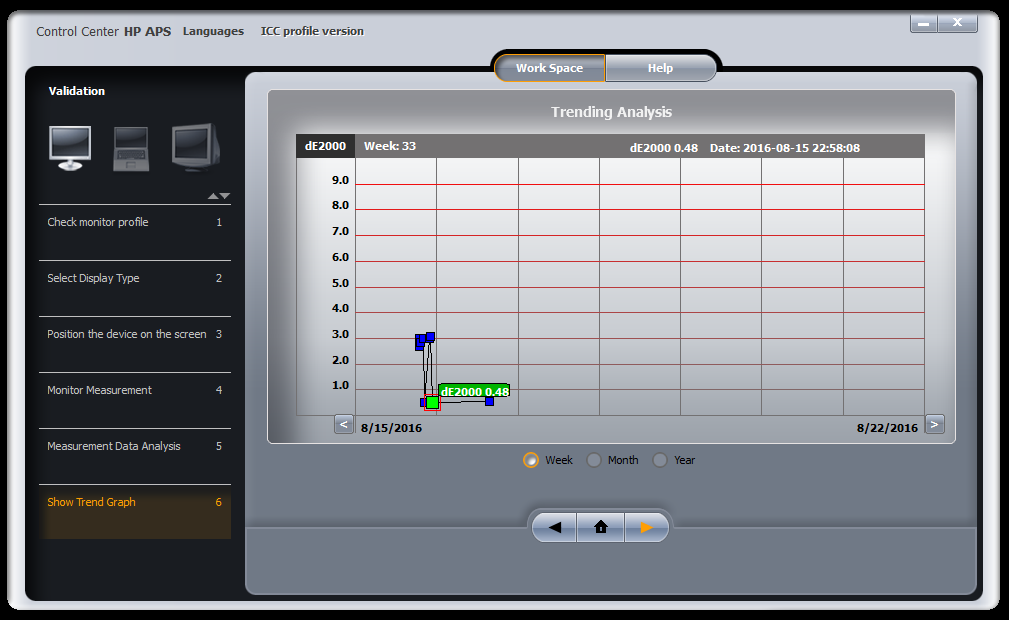
I am calibrating and profiling my monitors with an X-Rite colorimeter and, in my case, HP’s Advanced Profiling Solution software that came with my DesignJet Z3200 photo printer and it pairs well with my HP LP2475w monitor to help me achieve a color temperature of 6500 K, gamma 2.2, and a brightness around 90 lumens. While profiling my monitors connected to the WiGig dock yesterday I was getting some strange results: really poor profiles with high ΔE values.
Aside: a quick and dirty explanation is that ΔE is a measurement of the difference between a standardized color and the measurement of the color the monitor is displaying. As such, the lower that value, the closer the monitor is displaying “true” colors.
dE of HP Monitor profile when connected to the WiGig dock’s HDMI port.
dE of HP Monitor profile when connected directly to the laptop’s HDMI port.
Using the exact same hardware settings for brightness, contrast, and R, G, and B values, I produced two entirely different profiles when the monitor was connected (via HDMI) to the dock vs. directly to the HDMI port on my Latitude E5470. When plugged into the dock, Delta E averages 3.05. This is a hugely different number from the 0.48 achieved when plugged straight into the Latitude.
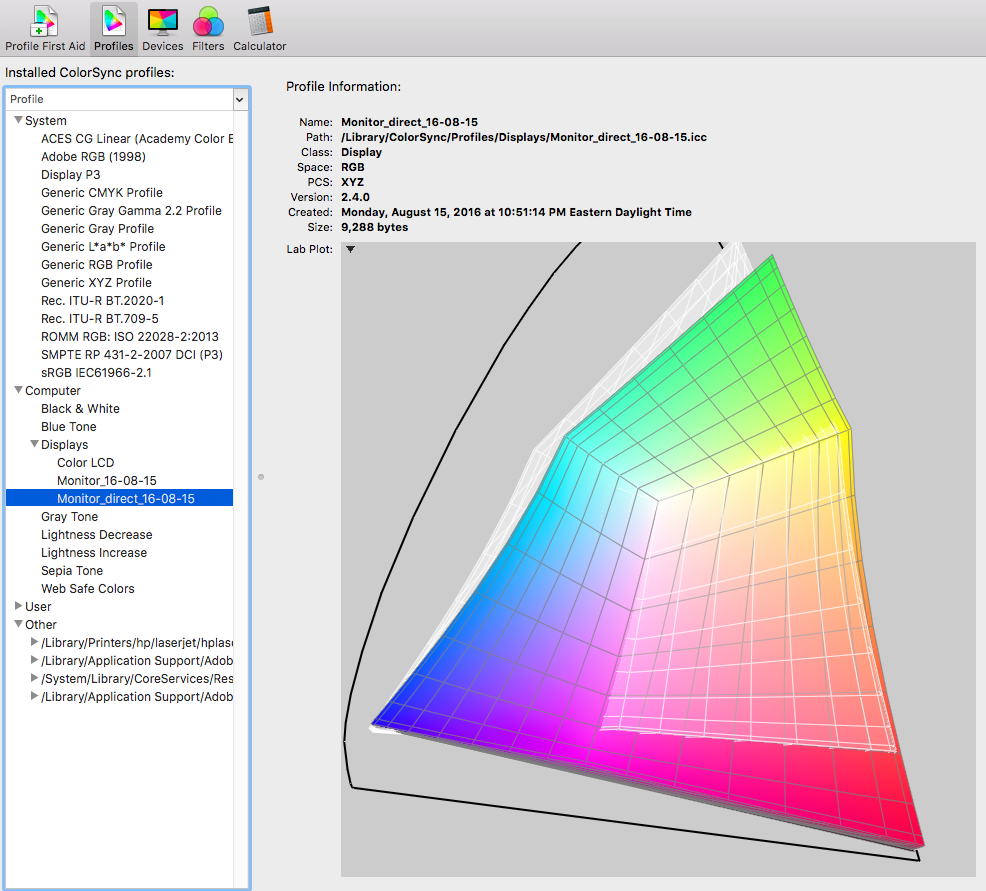
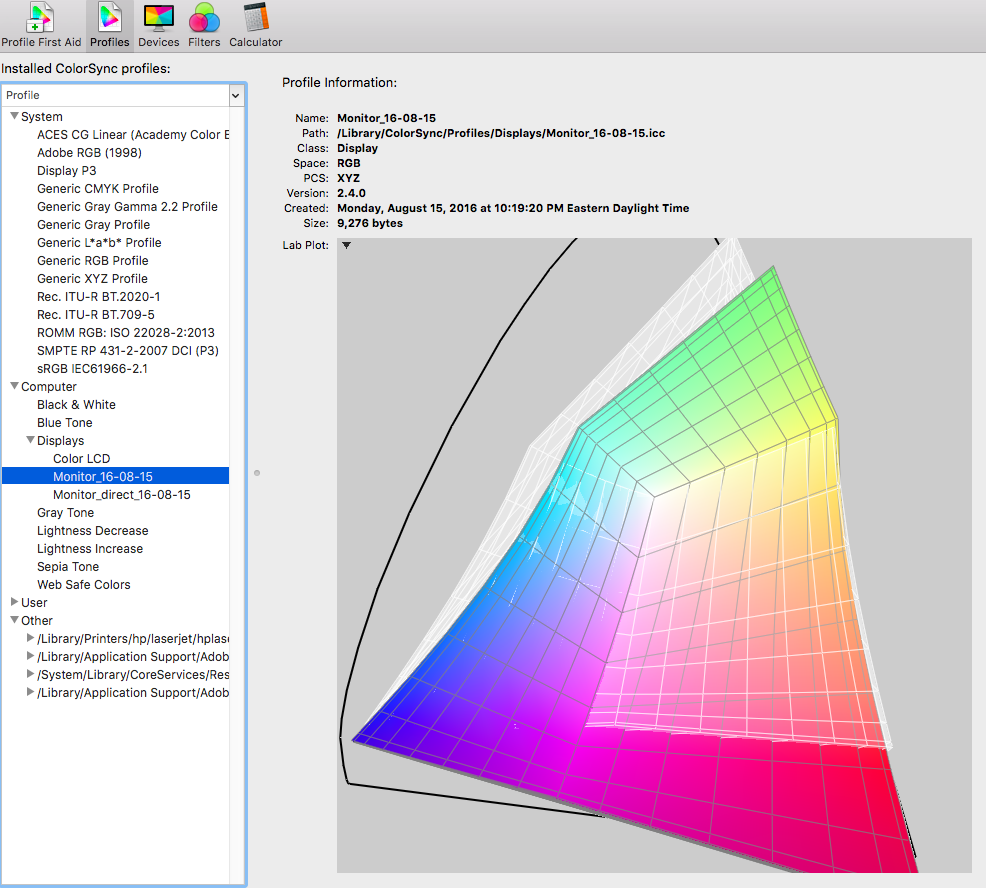
I can also visually demonstrate the differences in the ICC profiles that are generated during this process. I used my girlfriend’s Mac to load the two profiles into ColorSync and plotted the profiles against Adobe RGB colorspace (the white wireframe). Here, you can see that the monitor, when plugged in directly to the HDMI port on the Latitude, covers a lot of Adobe RGB’s color space. Not all of it, to be sure, but enough of it that it has worked for me for the past few years. I’ve been thinking about upgrading to a monitor that displays 100% of the Adobe RGB colorspace, but that’s neither here nor there.
Direct-to-laptop monitor profile (color) compared to the Adobe RGB colorspace (white wireframe)
Now, this is where things get weird. Below is the profile for the monitor when plugged into the WiGig dock. Note that the monitor profile (the colorful part) goes deeply out of bounds of the visible spectrum:
Dock-connected monitor profile (color) compared to the Adobe RGB colorspace (white wireframe)
The only conclusion I have been able to draw is that, unlike traditional docking, where the ports on the dock pass through directly to the computer, with a WiGig dock, there’s more happening than meets the eye. Somehow, in broadcasting the signal from the laptop to the monitor, it changes. Not in a noticeable way for most users, but for photographers and videographers, the change is problematic.
I’m sad that I’m going to post that I’ve had my first really negative experience with a company of which I’ve been a customer for eleven years: Really Right Stuff in California. I know this doesn’t affect too many folks, but if you work with tripods and use quick releases then it might.
Spoke to their customer service folks today about an order that I placed where I was given a bait and switch: we can’t fill your order but we can sell you something for twice as much as you were going to pay. In fairness, they would have shipped it for free (a whole $10 savings on a $400 product. I don’t really care about running out of stock, but the upsell (and a crappy deal at that) and the accusation that I ordered before they could take the listing off their web site really got to me. I spoke to their customer support manager, Mark, and was told that we will not be seeing eye to eye on this, and he didn’t care that I might choose not to be their customer going forward despite eleven years of history.
So if you’re thinking about any Arca-Swiss type equipment, I’d suggest that there are alternatives, such as Kirk Enterprises, Wimberley, Fourth Generation Designs, Jobu Design, and the list goes on…
Happy Thanksgiving!
American alligator, Merritt Island National Wildlife Refuge, Titusville Florida
Now through Monday, December 2nd, use coupon code blackfriday13 at Light’s Edge Prints to enjoy 40% off any signed print! Additionally, all orders for custom prints–including canvas prints–of your own photos uploaded via our web site will also receive 40 per cent discount on all services! (Note that the form uploads your photos to me to print, and you are billed separately.)
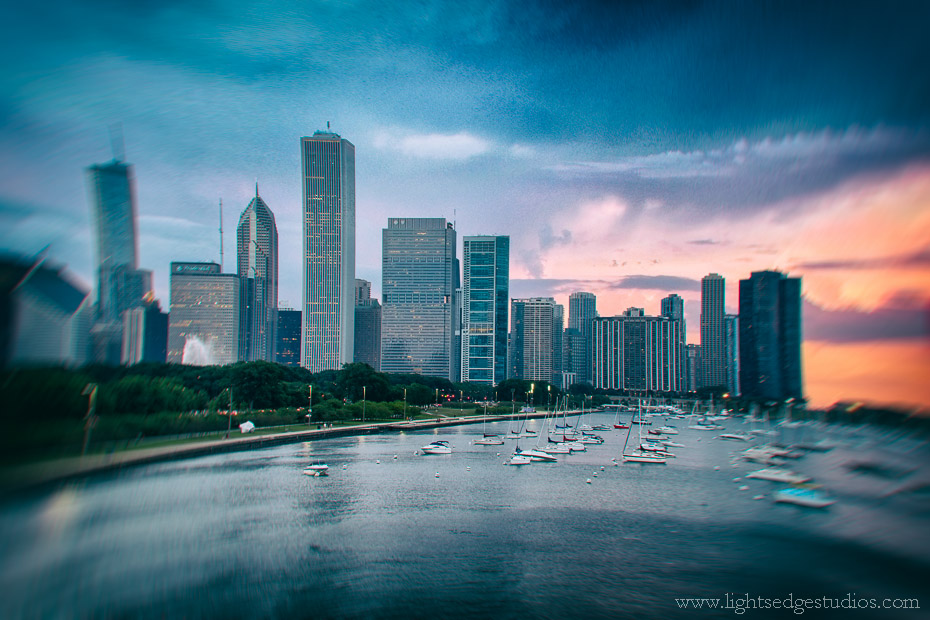
Chicago Skyline, July 2013 | Fuji X-E1 and XF 18-55mm lens @ 39mm | Exposed 1/18 sec. @ f/6.4, ISO 800
Today. while working on an image I am getting ready to print on canvas for a client, I was working in Photoshop and noticed that my Google Nik Collection toolbar had an option I had not noticed before. Through the magic (and guile) of automatic updates, Google added “Analog Efex” to the lineup. Essentially, it is a much more powerful (and adjustable) implementation of the sorts of alterations that have become so popular on mobile phones, including effects like “Toy Camera” (pictured above.) It is something I’ll use daily? Doubtful. But if you have the Google Nik Collection (and if you don’t, I recommend it highly as one of the best values in photographic software on the market) and don’t pay terribly much attention to the toolbar because you’re so accustomed to just reaching for Viveza or Dfine, take a closer look the next time you open it and explore the options.
I just read on DPReview this morning that new firmware is coming for the Fuji X-Pro 1 and Fuji X-E1 cameras that will enable focus peaking during manual focus! Combined with the new ability to choose the focusing point (and thus, where the 100% view of the frame will be targeted for finer manual focus via focus peaking) this should be a tremendous boost to the cameras’ functionality! Glad to see this coming out soon. Downloads for the cameras will begin next week.
One thing that has been very nice to see from Fujifilm is that the company seems responsive to user’s wants and observations. The Fuji X-E1 shipped with essentially the same button layout as the X-Pro 1. This places the AF point selection button on the extreme lower left of the camera. To me, this is incredibly awkward both when holding the camera to my eye and when holding the camera out and using the rear screen to compose. My approach has been to keep the camera in manual focus mode, and use the AF-Lock button to activate the central AF point as needed, and then recompose. Up to this point, this has been an acceptable, although not terrific solution.
By comparison, the newer X-100S, which cannot accept interchangeable lenses (but does have a leaf shutter!) has a much improved location for the AF point selection button: the “up” arrow button of the four-way controller. On the X-E1, this button controls macro focusing on some lenses. But the “down” arrow wasn’t doing anything, other than scrolling in menus, of course.
So, with the release of firmware 1.06, available at http://www.fujifilm.com/support/digital_cameras/software/firmware/x/xe1/index.html, Fuji gave the “down” button something to do: it can call up the AF point selection. This makes the ergonomics of actually selecting a focusing point something that is comfortable to do! Thank you, Fuji, for transforming an annoyance into something that is simply a “quirk.” Now, if the dedicated AF button on the lower-left was also made user-programmable in the process, I would have been able to eat cake and have it, too. Maybe on the next go-round!
Oh, and if interested, the screen protector I am using on my X-E1 is the Giottos SP-8300, the strap is from UpStrap, and the plate on the bottom of the camera is from Really Right Stuff. More about that after next week, where I’ll be in Asheville and running up and down the Blue Ridge Highway once again…with the X-E1 in addition to my standard Canon kit!
West Point on the Eno River, Durham, North Carolina | Fuji X-E1 and 18-55mm f/2.8-4 lens @ 44mm | Exposed 1/40 sec @ f/4, ISO 800
In the United States its Independence Day. Among other celebrations, there’s a festival just to the west of where I live for Eno River State Park both today and Saturday. I figure what better way to announce a print sale than with an image from one of our favorite corners of the Triangle?
Today through Sunday, July 7th, 2013, enter the code “fireworks13” at checkout to enjoy 13% off all prints ordered through www.lightsedgeprints.com! If you’ve seen something on this blog that’s not available on Light’s Edge Prints, please contact me and I’ll get it up there for you! I will fill orders in about one week’s time, as I print and sign each individually. Best wishes for a safe and happy weekend!
Oak Hammock Park, Port. St. Lucie, Florida | Fuji X-E1 and 18-55mm lens | Exposed 1/17 sec. @ f/5, ISO 1600
While out letterboxing, Summer and I came upon a hidden gem of a local preserve in Port St. Lucie, Florida: Oak Hammock Park. The winding path took us through seemingly endless palms, palmettos, and oaks. We entered the path near dusk, and while the air was thick with humidity, we didn’t really get eaten alive by mosquitoes. Strange!
I was very glad that I took the Fuji X-E1 with me; its light weight makes it easy to take anywhere, and the image stabilization built into the 18-55mm lens is surprisingly good. The image above is very sharp despite being made at 1/17 sec hand-held!
Merritt Island National Wildlife Refuge, Titusville, Florida | Fuji X-E1 and 18-55mm f/2.8-4 lens | Exposed 1/25 sec. @ f/8, ISO 800
As I mentioned in my posting the other day about learning from my mistake, we enjoyed a lovely scene over the wetlands of Merritt Island National Wildlife Refuge. While my 5D Mark II was packed along for the ride, the camera I actually reached for was my new Fuji X-E1. Why? It’s small and light enough–and the IS built into the 18-55mm lens good enough–to let me “hail mary” the camera above my head for a better angle on the landscape. I certainly won’t abandon 35mm format anytime soon, but I continue to be impressed by the capabilities and quality available with compact systems.