I’ve recently changed my primary computer from a Thinkpad W520 to a Dell Latitude E5470. I wanted to retain the quad core Intel processing that I had grown accustomed to, as well as the ability to have 32gb RAM, but the 6 pound laptop with the one pound power adapter was getting to me: I needed to downsize. I sacrificed an inch of screen real estate, the built-in Huey colorimeter, and the classic style keyboard. But, I also ditched three pounds. And by purchasing in the Dell outlet, I spent half what I did in 2011. In the end, I’d call that a win.
Over the last few years, Intel has been developing Wireless Gigabit (WiGig) cards and receivers that manufacturers like Dell, HP, and Lenovo have implemented to create “wireless docking” for laptops. The only thing that isn’t wireless is charging: you still need to plug in the laptop for that. But, the laptop wouldn’t necessarily have to be on my desk to connect to the dock, and that frees up space in my cluttered world. So, I thought I would give it a try. And the short of it is that it works. My Drobo and other USB 3 hard drives were connected to the dock, along with my monitors, and I figured I was set. The long of it is that I can’t get my monitor to calibrate and profile correctly using the dock. A monitor connected to a WiGig dock does not simply pass through to the laptop the way that it would on a mechanical dock: it appears to influence the way colors are displayed.
First, for reference, this is the equipment and software versions I have:
Latitude E5470 running Windows 10 Pro
Dell WLD 15 Wigig Dock
Intel Wireless Dock Manager v. 2.6.0.90
Intel Tri-Band 18260
Intel Proset drivers v. 19.0.1621.3340
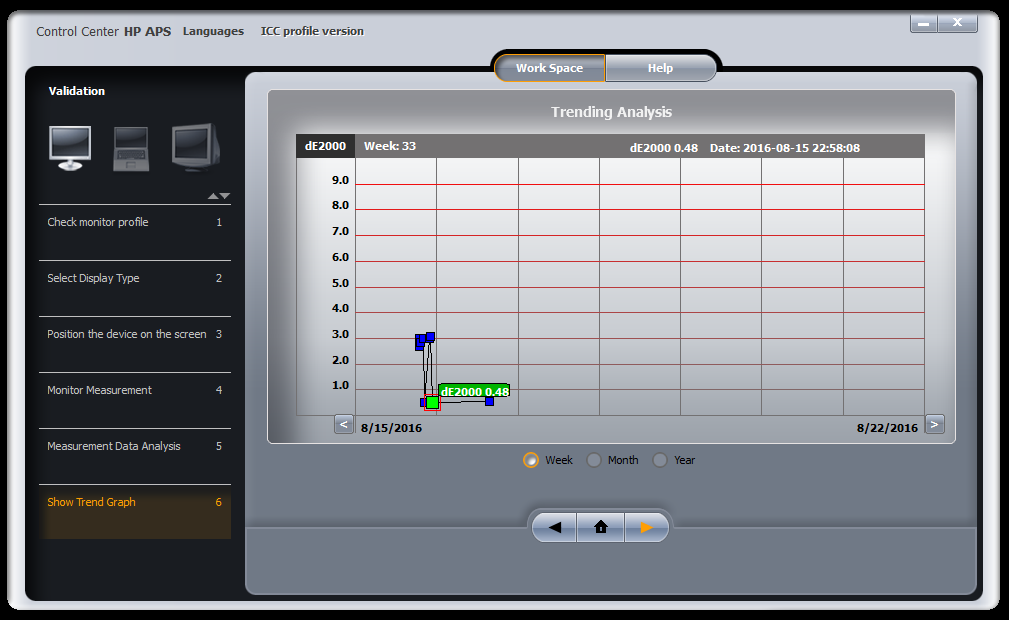
I am calibrating and profiling my monitors with an X-Rite colorimeter and, in my case, HP’s Advanced Profiling Solution software that came with my DesignJet Z3200 photo printer and it pairs well with my HP LP2475w monitor to help me achieve a color temperature of 6500 K, gamma 2.2, and a brightness around 90 lumens. While profiling my monitors connected to the WiGig dock yesterday I was getting some strange results: really poor profiles with high ΔE values.
Aside: a quick and dirty explanation is that ΔE is a measurement of the difference between a standardized color and the measurement of the color the monitor is displaying. As such, the lower that value, the closer the monitor is displaying “true” colors.
dE of HP Monitor profile when connected to the WiGig dock’s HDMI port.dE of HP Monitor profile when connected directly to the laptop’s HDMI port.
Using the exact same hardware settings for brightness, contrast, and R, G, and B values, I produced two entirely different profiles when the monitor was connected (via HDMI) to the dock vs. directly to the HDMI port on my Latitude E5470. When plugged into the dock, Delta E averages 3.05. This is a hugely different number from the 0.48 achieved when plugged straight into the Latitude.
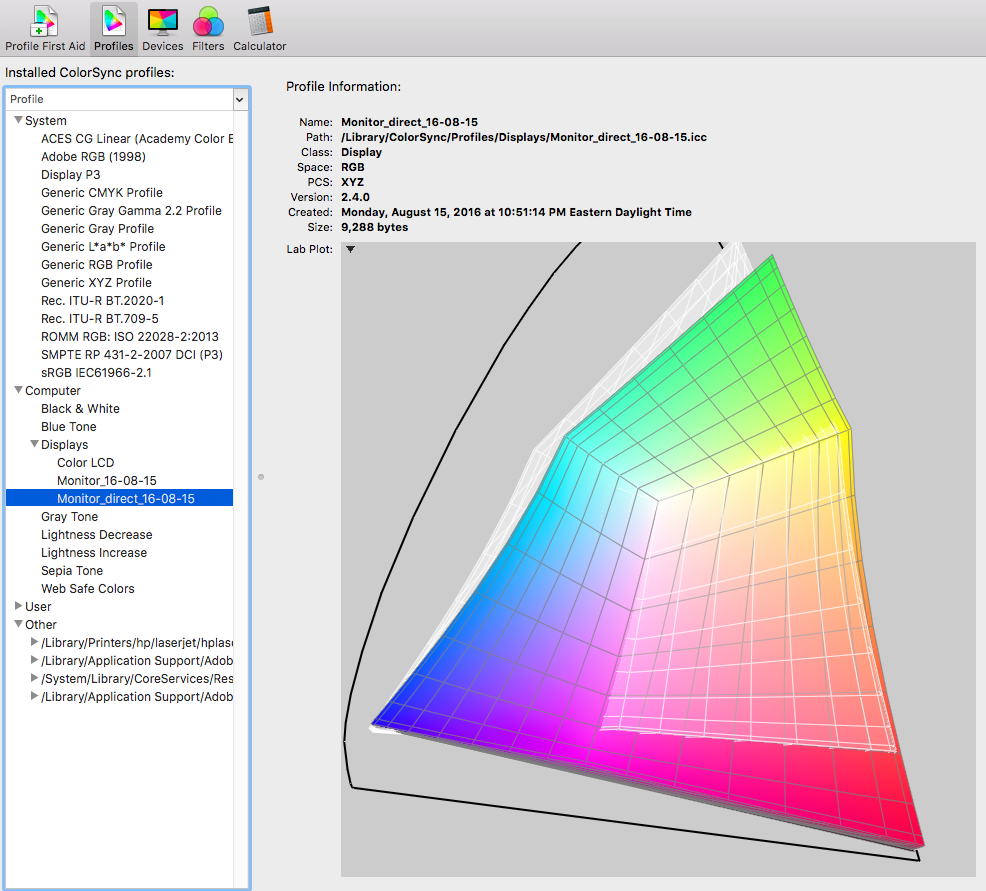
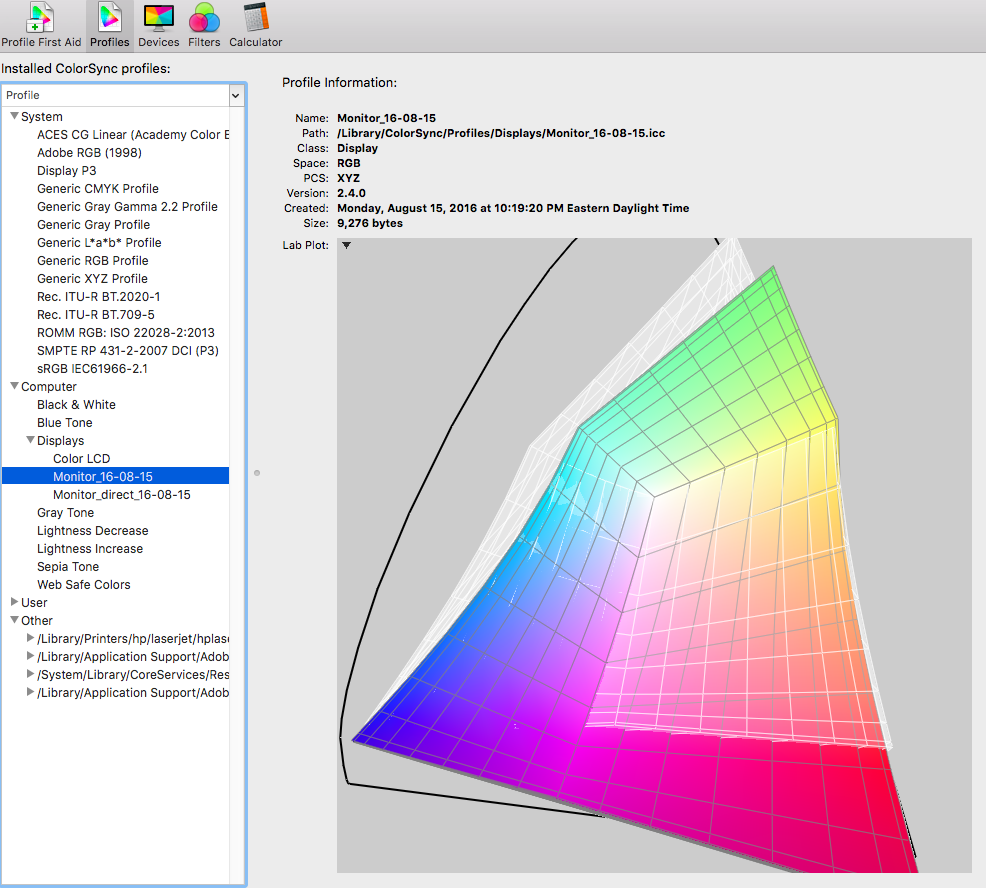
I can also visually demonstrate the differences in the ICC profiles that are generated during this process. I used my girlfriend’s Mac to load the two profiles into ColorSync and plotted the profiles against Adobe RGB colorspace (the white wireframe). Here, you can see that the monitor, when plugged in directly to the HDMI port on the Latitude, covers a lot of Adobe RGB’s color space. Not all of it, to be sure, but enough of it that it has worked for me for the past few years. I’ve been thinking about upgrading to a monitor that displays 100% of the Adobe RGB colorspace, but that’s neither here nor there.
Direct-to-laptop monitor profile (color) compared to the Adobe RGB colorspace (white wireframe)
Now, this is where things get weird. Below is the profile for the monitor when plugged into the WiGig dock. Note that the monitor profile (the colorful part) goes deeply out of bounds of the visible spectrum:
Dock-connected monitor profile (color) compared to the Adobe RGB colorspace (white wireframe)
The only conclusion I have been able to draw is that, unlike traditional docking, where the ports on the dock pass through directly to the computer, with a WiGig dock, there’s more happening than meets the eye. Somehow, in broadcasting the signal from the laptop to the monitor, it changes. Not in a noticeable way for most users, but for photographers and videographers, the change is problematic.
I’m sad that I’m going to post that I’ve had my first really negative experience with a company of which I’ve been a customer for eleven years: Really Right Stuff in California. I know this doesn’t affect too many folks, but if you work with tripods and use quick releases then it might.
Spoke to their customer service folks today about an order that I placed where I was given a bait and switch: we can’t fill your order but we can sell you something for twice as much as you were going to pay. In fairness, they would have shipped it for free (a whole $10 savings on a $400 product. I don’t really care about running out of stock, but the upsell (and a crappy deal at that) and the accusation that I ordered before they could take the listing off their web site really got to me. I spoke to their customer support manager, Mark, and was told that we will not be seeing eye to eye on this, and he didn’t care that I might choose not to be their customer going forward despite eleven years of history.
So if you’re thinking about any Arca-Swiss type equipment, I’d suggest that there are alternatives, such as Kirk Enterprises, Wimberley, Fourth Generation Designs, Jobu Design, and the list goes on…
Happy Thanksgiving!
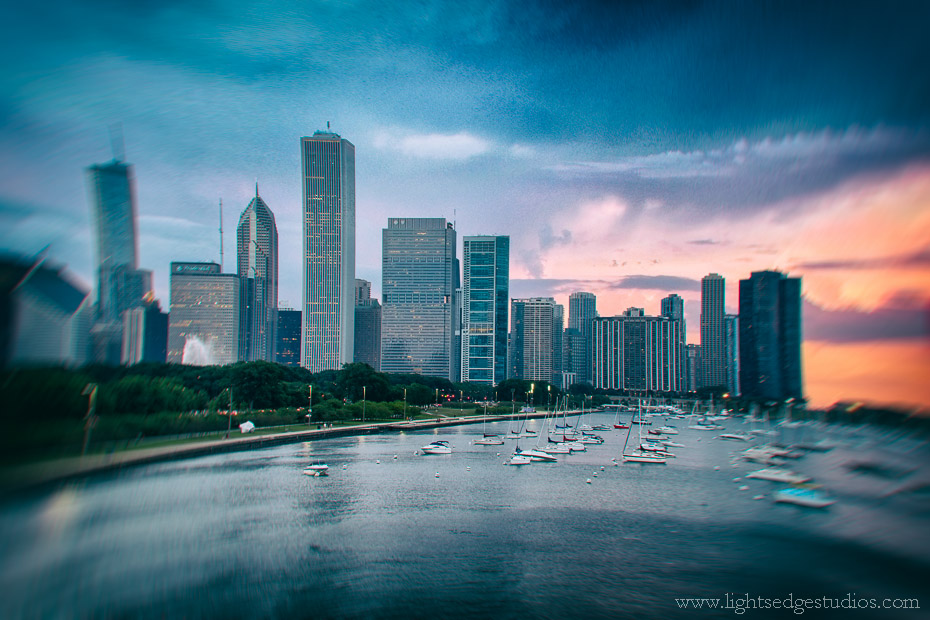
Chicago Skyline, July 2013 | Fuji X-E1 and XF 18-55mm lens @ 39mm | Exposed 1/18 sec. @ f/6.4, ISO 800
Today. while working on an image I am getting ready to print on canvas for a client, I was working in Photoshop and noticed that my Google Nik Collection toolbar had an option I had not noticed before. Through the magic (and guile) of automatic updates, Google added “Analog Efex” to the lineup. Essentially, it is a much more powerful (and adjustable) implementation of the sorts of alterations that have become so popular on mobile phones, including effects like “Toy Camera” (pictured above.) It is something I’ll use daily? Doubtful. But if you have the Google Nik Collection (and if you don’t, I recommend it highly as one of the best values in photographic software on the market) and don’t pay terribly much attention to the toolbar because you’re so accustomed to just reaching for Viveza or Dfine, take a closer look the next time you open it and explore the options.
One thing that has been very nice to see from Fujifilm is that the company seems responsive to user’s wants and observations. The Fuji X-E1 shipped with essentially the same button layout as the X-Pro 1. This places the AF point selection button on the extreme lower left of the camera. To me, this is incredibly awkward both when holding the camera to my eye and when holding the camera out and using the rear screen to compose. My approach has been to keep the camera in manual focus mode, and use the AF-Lock button to activate the central AF point as needed, and then recompose. Up to this point, this has been an acceptable, although not terrific solution.
By comparison, the newer X-100S, which cannot accept interchangeable lenses (but does have a leaf shutter!) has a much improved location for the AF point selection button: the “up” arrow button of the four-way controller. On the X-E1, this button controls macro focusing on some lenses. But the “down” arrow wasn’t doing anything, other than scrolling in menus, of course.
So, with the release of firmware 1.06, available at http://www.fujifilm.com/support/digital_cameras/software/firmware/x/xe1/index.html, Fuji gave the “down” button something to do: it can call up the AF point selection. This makes the ergonomics of actually selecting a focusing point something that is comfortable to do! Thank you, Fuji, for transforming an annoyance into something that is simply a “quirk.” Now, if the dedicated AF button on the lower-left was also made user-programmable in the process, I would have been able to eat cake and have it, too. Maybe on the next go-round!
Oh, and if interested, the screen protector I am using on my X-E1 is the Giottos SP-8300, the strap is from UpStrap, and the plate on the bottom of the camera is from Really Right Stuff. More about that after next week, where I’ll be in Asheville and running up and down the Blue Ridge Highway once again…with the X-E1 in addition to my standard Canon kit!
Red Leaf, Price Lake, Blue Ridge Highway. | Canon 5D Mark II and 24-70mm f/2.8L @ 70mm | Exposed 1/60 sec. @ f/4, ISO 100
Since it was launched in 2007, I have been an avid user of Adobe’s Lightroom. One of the things that I have loved about the strengths of the “Develop” module (also called Camera RAW in Photoshop, as they share the same engine) is that I have felt progressively less need to port an image into Photoshop for further enhancement. This has been especially true since version three onward, as the local enhancements offered by the brush and gradient tool have made selections very easy. Need to brighten the bride’s face but keep the dress the same value? No problem, just use the brush. Photoshop? Why bother.
I realize I’m likely the last person to get on board the Nik Software bandwagon (especially since even Google decided that it was a good one to hop onto….or guide into its garage, if we continue that metaphor). Because we don’t really know what that acquisition means, re-sellers are steeply discounting the existing lineup of products. I tried their demo of HDR Efex a while back and was impressed, and decided to roll the dice and pick up their entire collection for Lightroom. The disadvantage for some people is that this product cannot be launched from inside of Photoshop: instead, you create a copy of the image as a TIFF file and port it into whichever Nik program you’ve selected. Since I’m avoiding Photoshop for the most part, this approach doesn’t phase me.
For making color images, Viveza 2 and Color Efex 4 are a pretty amazing combination. Over the last few days I’ve developed a workflow of adjusting my images globally in Lightroom, and then working on local contrast in Viveza. If I want the foliage of the trees to be more subdued to make the bare branches of the foreground trees to stand out, it’s easy to do. No more near-impossible layer masks in Photoshop!
Colors along the highway, Blue Ridge Highway near the Linn Cove Viaduct on October 14, 2012. | Canon 5D Mark II and 70-200mm f/4L IS lens @ 97mm | Exposed 1/15 sec. @ f/11, ISO 100
I have posted this image before; while it is similar to the original, the trees stand out more. And going forward, I can only see advantages to using Nik software whenever my goal is to make tonal changes to ranges of color. No, I would not suggest using these programs for every image. But for those that have commercial value, I can see only advantages. Below is a series of three panoramas. The first was the result of stitching in Photoshop, but all of the toning had taken place as global adjustments on the RAW files within Photoshop. Beneath that is the result of toning the image in Viveza 2, and the final photo is the finished product from Color Efex 4. Each round of processing builds on the previous.
Price Lake, Lightroom OnlyPrice Lake, toned in Lightroom and VivezaPrice Lake, toned in Lightroom, Viveza, and Color Efex 4
To my eyes, the key differences in these images can be found in the quality of the clouds and the colors and details of the reflection, especially in the treeline. I don’t think that this software is for everyone, and some may wish to hold off on purchase until Google makes some sort of announcement to detail what kind of support will be extended to current users as they go forward. For me, this is a worthwhile process for anything I rank three stars or higher, as well as some of my two star photographs.
More thoughts to come, as well as mini reviews of the 5D Mark III and LensAlign’s new software, Focus Tune!
Katie at the Gardens, Sarah P. Duke Gardens, Durham, N.C. | Canon 5D Mk. II and Zeiss Planar T* 85mm f/1.4 ZE lens | Exposed 1/250 sec. @ f/3.2, ISO 100.
While testing the Zeiss 85mm two weeks ago, I ran into Katie at the Sarah P. Duke Gardens and made a quick portrait. While I’d really need to have them side-by-side to do a more thorough comparison, it seems that the Canon 85mm f/1.2L Mk. II has far superior bokeh, but that the Zeiss might actually be a sharper lens from f/2.8 and smaller–but the Canon would definitely win at the largest apertures. Either way, the Zeiss has fantastic micro-contrast, good bokeh, and clearly has potential for portraits…so long as your subject understands that it will take a second to (manually) focus!
Cherry blossom petals, Sarah P. Duke Gardens, Durham, N.C. | Canon 5D Mk. II and Zeiss Planar T* 85mm f/1.4 ZE lens | Exposed 1/160 @ f/4, ISO 100.
While I was not able to use the Zeiss 85mm lens I rented nearly as much as I had anticipated during the week that I had it, I will say that it is disappointingly soft wide-open, but sharpens up dramatically by f/2, and is wickedly sharp at f/4. The detail in the fallen cherry blossom petals is amazing!
Also, some big changes are coming as I am in the process of becoming an LLC in the state of North Carolina. More to come…
Daffodils in bloom, Durham, N.C. | Canon 5D Mk. II and Zeiss Planar T* 85mm f/1.4 ZE lens with Canon 25mm extension tube | Exposed 1/80 sec. @ f/5.6, ISO 800.
Last week was far busier than I had anticipated when I scheduled the rental of a Zeiss Planar T* 85mm f/1.4 ZE lens. I feel that I wasn’t really able to put the lens through its paces, mostly staying close to home due to a couple of developments that I’ll be announcing here shortly. Since I was working at home I worked with subjects at hand: loaves of bread, the cat, and our garden.
While soft wide-open at f/1.4 (to the point of being almost unusable), by f/2 this lens is razor sharp, and features the oft-fabled Zeiss micro-contrast: in-focus part of the image does seem to defy its two-dimensional nature. However, working in close quarters is where this lens struggles: the minimum focusing distance is three feet.
For this photograph of the daffodils that were in bloom in our front yard until yesterday, I had to resort to a 25mm extension tube, which presented me with the opposite of my problem: suddenly I had no choice but to be closer to my subject than I would have wished! That said, I think it works in this example. I’ll have a couple more to share after I get a spare moment to work them up.
As long as cameras have featured autofocus, photographers have complained about its shortcomings: sometimes autofocus (AF) is dead-on, sometimes it focuses ahead of the intended target, and sometimes it focuses behind it. These flaws have been described as front-focus and back-focus, respectively. The reason for the fault in AF is found in the manufacturing process: a camera body’s AF is calibrated to a “standard” lens. However, the lenses that are produced on the assembly line are made within tolerances for deviation. With their higher resolution, DSLR’s have revealed that the tolerances in manufacturing clearly are not as strict as demanding photographers would like.
A few years ago, Michael Tapes of the eponymous Michael Tapes Design was working to create a device that photographers could use to accurately determine if and what type of focusing problems they had with their equipment. Tapes’ vision was that photographers would have proof to show the manufacturer that what they were seeing in their images was not, in fact, user error but the result of equipment. Coincidentally, just as the LensAlign Pro was coming to market, camera manufacturers provided a means to correct front-focus or rear-focus problems in-camera with Autofocus Micro-Adjustments (referred to as AFMA in this review), often buried deep in the user menu. Canon was the first to announce such a feature in its 1D Mark III body, and Nikon quickly followed suit. Note that Nikon refers to this feature as “AF Tune.”
In the fall of 2010, while reviewing a LensAlign Pro on loan from Michael Tapes Design, it was hinted that a new product was coming that would replace the less expensive but discontinued LensAlign Lite. The new unit would offer the same rear-sighting ability as the larger LensAlign Pro, it would ship flat, and it would be more cost effective for the company to produce. In total, these would make it, at least on paper, a win for customers and for the producer. And it would bear a “Mark II” designation that seems quite popular among many manufacturers at the moment.
The LensAlign MkII functions much like its larger stablemate, the LensAlign Pro, so you may wish to refer to my review of the LensAlign Pro (Part One and Part Two) before continuing. Also, if you own a LensAlign MkII, you should consult the LensAlign resources page for documentation and the ever-useful distance tool.
First a prototype and then a final production version of the LensAlign MkII was provided to me by Michael Tapes Design to prepare this review.
Design
What you see is what you get: seven pieces come together to form the new LensAlign MkII
The LensAlign MkII is essentially a scaled down LensAlign Pro that weighs in at a mere three ounces. In comparison, the LensAlign Pro is almost four times heavier at 11 ounces. One of the most exciting elements of the design of the MkII is that it shares the rear-sighting system of the LensAlign Pro.
While offering the same accuracy as the Pro model, the MkII’s construction is radically different: the pieces are cut on a precision die and are assembled by the end user. The MkII ships (and can be stored) flat in seven pieces: a sturdy base made of extruded PVC with an aluminum bottom plate and quarter-inch tripod socket, a front and back plate with sights for both standard and macro lenses, and three parts that fit on the side to keep the front and back parallel all come to support the most important part of the unit: the ruler.
The components are made of thin polystyrene but they have a lot of “flex” to them; at first I feared if I didn’t put them together correctly they would crack, but they go together quite smoothly. And because the pieces can bend there’s little risk of their breaking during assembly–in fact, the ruler is designed to “bow” into place. I have taken apart and put together both the prototype and the production version multiple times without any problems.
Click through the photos below to see how the LensAlign MkII fits together:
Note that this sequence was made while I was using the prototype of the LensAlign MkII. The final production version is assembled in the same fashion.
The Ruler
Calibrating a Canon 100mm f/2.8 macro lens on the LensAlign MkII: the focus is on the “macro” target (closest to the ruler). Note that distortion can fool the eye into thinking that the lens is not centered on the target.
Since all of the other pieces come together to support the ruler, I would be remiss not to discuss it. The ruler on the MkII is an inch longer than the Pro’s, as well as half an inch wider, and double-sided with two different patterns. The first side has white numbers within black shapes, and the opposite side has black numbers within white shapes. My preference is for the white-within-black pattern, but users should try both to see which seems to be easiest for them to “read.” However, unlike the Pro, the ruler on the MkII is fixed at a 20-degree angle (Position Three on the Pro).
Initially I thought this might present more of a problem than it really does in practice. With the LensAlign Pro I will use the 20 degree position the most, but will occasionally switch to the 12.5 degree-angle when it seems too much of the ruler is in focus as the harsher angle limits can make the boundaries of the DOF “pop” a bit more. With the MkII the left-most row of numbers can sometimes be obscured by part of the front standard–this happens when calibrating wide angle lenses and macro lenses where the distance from sensor plane to LensAlign is two feet or less. However, the extra width of the MkII’s ruler means that there are more patterns to compare on opposite sides of the 0 Mark, so the difficulty in evaluating the smallest column of numbers is mitigated by comparing the two patterns immediately to the right, as in the photo above.
In Use
The LensAlign MkII has both a quarter-inch thread as well as four feet on the bottom for tabletop use. While it would be possible to use the MkII on a table, mounting it on a tripod offers far greater flexibility for making the face of the unit square to the camera. As discussed in the first part of my review of the LensAlign Pro, both the camera and tripod need to be positioned at a distance equal to 25 times the focal length of the lens (for instance, a 100mm lens should be calibrated from 2500mm away, or 8.2 feet). The camera and target are in alignment when the central AF sensor is aimed at the central view port on the LensAlign, with the bulls-eye perfectly centered within. For more details on the process of squaring the target to the camera, Tapes’ recent article about “Using True Parallel Alignment (sighting system) best practices” is a quick but good read.
For my testing of both the prototype and production MkII I attached Arca-Swiss style quick-release plates to make mounting on the tripod an easy affair. Another advantage of using an Arca-Swiss style quick release is that the LensAlign MkII or your camera body can slide from left-to-right within the channel of the quick-release clamp. This can make fine-tuning the position of the red AF target within the bulls-eye a snap and help avoid re-positioning a tripod when a minor adjustment is all that is necessary!
As I discussed in my review of the LensAlign Pro, there are three different ways of evaluating the autofocus performance and subsequent micro-adjustments:
reviewing the images on the camera’s rear screen
taking the flash card inside and reviewing the images on a computer monitor
shooting tethered so that the images appear instantly on a computer.
I’ve found that shooting tethered is the most effective way of working with the LensAlign MkII, but it certainly has its share of disadvantages, among them glare off of the laptop screen when working outside and power and USB cables to avoid tripping over. Simply reviewing the images on the back of the camera may be one of the “fastest” means of calibrating the focus, and it seems to work well most of the time. However, there are times when two or three micro-adjustment settings all look “pretty good” on the rear screen. In a situation like that, importing the JPEG’s (no need to shoot RAW) into Photoshop to use the emboss filter can help to determine which is the best setting.
Using the Emboss Filter: set the angle to 135 degrees and the height to three to make the depth of field “pop” on the LensAlign ruler
At the moment I cannot find a way to identify AFMA settings in a photograph’s metadata (evidently Canon DPP software can provide this information on Canon cameras). It is important to be mindful that the MkII does not have an “enumerator” like the Pro (there’s no built-in visual reference for which AFMA was used or how far apart the camera and LensAlign were in a given image), but a sticky note is an easy stop-gap!
My Method
Tethered capture in Adobe Lightroom
I prefer to work indoors, with the camera tethered to my computer when I’m calibrating lenses no longer in focal length than my 70-200mm zoom. I keep Adobe Lightroom open in tethered capture mode and review the JPEGs at 100% on my 24 inch monitor. A standard 16 foot tape measure will suffice for placing the camera and target at appropriate distances whenever working inside. If there’s diffuse light coming in through the window, I’ll use that. However, while I must be tripod-mounted to use the LensAlign, I prefer not to use slow shutter speeds.
Calibrating with the LensAlign MkII indoors with a wirelessly-triggered off-camera flash to illuminate the ruler.
So, if my shutter speed dips below 1/100 second using available light I will set up an external flash and bounce it off of the (white) ceiling in my office. Note that the flash is there to help evaluate the ruler, not the front standard, so bouncing off the ceiling is ideal as it will evenly illuminate its surface . Just be sure not to overexpose the ruler!
While I set up a flash wirelessly using an ST-E2 transmitter and a single Canon speedlite mounted on a light stand (unless I’m calibrating the 7D, in which case I will use its built-in wireless flash control), mounting a strobe in the camera hot shoe and bouncing it off the ceiling will work.
When calibrating the AF with a lens longer than 200mm I wait for good weather and set up outdoors, grabbing a 50 foot reel tape measure on my way out the door. I have tried to work tethered with a laptop outdoors, but I’ve found the glare off my laptop screen to be unacceptable. Your mileage may vary as not all screens are the same! I typically try to work off of the camera’s rear screen, but sometimes I have to make a series of images (with sequential changes in AFMA) and take the flash card inside to scrutinize the images on my computer.
I recommend recording individual cameras and lenses and the best AFMA for each combination in a spreadsheet. Include the date that you perform the adjustment! As I discussed in the second part of my LensAlign Pro review, it would behoove users to calibrate their lenses before any major shoot, and then again a month later, and once again three months to the day of the original calibration. This is because the best AFMA for a given camera and lens may change with time–although the change need not be universal. This February both my 5D Mk. II and 1D Mk. III required a change in AFMA with my 70-200mm lens–I calibrated it with a LensAlign MkII prototype over Christmas–but the setting I had found for my 7D last fall with the LensAlign Pro remained “good.”
Compared to Lens Align Pro
LensAlign MkII and LensAlign Pro side-by-side
While it doesn’t exactly replace the LensAlign Pro, the LensAlign MkII offers the same ability to test and adjust the autofocus performance of DSLR’s as its bigger brother, for for $100 less. Of course there are differences between the two models, but how significant they are is ultimately up to the end user, but even their designer has a preference.
While speaking to me about the design of the new LensAlign, Tapes said: “Personally, I use the MkII: it’s smaller, lighter, easier.” Retail price aside, the fundamental differences between the MkII and the Pro lie in their construction, the ruler angles, the enumerator, and the Long Ruler Kits.
Construction:
The LensAlign MkII is made of thin, lightweight, and flexible polystyrene; the components are designed to be locked together and taken apart by the end user. The MkII is more portable than the LensAlign Pro, which is made of beefier extruded PVC, assembled at the factory and then laser-tested for accuracy before shipping. (It should never be taken apart since it may no longer be accurate after being reassembled.) To travel with the MkII, simply put its pieces in a rigid envelope and drop it in the bottom of a suitcase with folded pants or other clothes. I simply cannot recommend air travel with the LensAlign Pro.
Rulers & Angles:
The improved, wider ruler pattern makes up for the fixed 20 degree angle on the MkII. On the LensAlign Pro I only use the 20 degree and 12.5 degree positions any ways. Additionally, the MkII’s ruler has a matte surface whereas the Pro’s ruler is highly reflective, making the MkII easier to work with in sunny situations.
Enumerator
This might be the only thing absent on the MkII that makes me nostalgic for its predecessor. The enumerator on the LensAlign Pro can be very helpful when comparing changes to the AFMA on a computer. However, a pad of sticky notes and a pen will do the same thing, if nowhere near as elegantly.
Long Ruler Kits
An optional accessory, the Long Ruler Kit on the LensAlign Pro creates a four-foot ruler. Because the material is nowhere near as rigid, the MkII’s Long Ruler Kit will feature only a two-foot ruler. The idea behind the Long Ruler Kit is that a photographer may set up the target at a greater distance than the recommended 25 times the focal length of the lens. Tapes explains that this can be beneficial for photographers with super-telephoto lenses who often photograph their subjects from great distances and therefore would prefer to calibrate from healthy distances. Not having used one of these kits I cannot speak to their functionality, but I will say that so far I have not felt the need for one in calibrating lenses up to 1000mm in effective focal length (500mm with a 2x TC). If the idea of a four-foot ruler appeals, there is only one choice.
Conclusion
In my review of the LensAlign Pro I wrote that “The good news is that even if LensAlign is the only practical tool available, it’s a good one.” This holds true for the LensAlign MkII: no other company makes a tool that offers the accuracy of the LensAlign family of products. DataColor didn’t try very hard when they came up with the Spyder Lens Cal, and no one else has stepped up to the plate. The LensAlign Pro is a great tool, but an expensive one both for the consumer and the manufacturer. The LensAlign MkII is every bit as accurate and more gentle on consumers’ wallets. Yet, I know there are those who are going to ask whether the product is “worth” the $80 expense.
I think the LensAlign MkII a no-brainer as it helps a bag full of expensive lenses produce the absolute sharpest images they possibly can. Personally, I never knew that the 16mm end of my 16-35mm zoom could resolve the level of detail that it does now that I’ve used a LensAlign; it’s like having an entirely different–and better–lens.
In a world full of hundreds of accessories that are priced in the range of $50-$100, the LensAlign MkII might just be the best value on the shelf. Highly Recommended!
Since July 2009 I have been using Mozy’s consumer product, MozyHome, to back up my e-mail, documents, school files (past and present), Lightroom databases, music, videos, and most recently, my photographs. For a reasonable fee ($54.45 for 12 months) I could back up as much as I wanted. That ended yesterday when I received an e-mail from Mozy that the prices would be going up and the unlimited plan would be phased out in favor of a usage-based pricing schedule.
E-mail from Mozy received 1 February 2011
Ultimately, I was hoping to back up all of my photos to Mozy’s cloud: 516 gigabytes at present. If I had kept my account at MozyHome, and my files finally finished uploading, I would have needed their $9.99 per month ($119.88 per year) plan to get my base storage space expanded to 125 gb, and would have paid an additional $20 per month (sold in 20 gb blocks for $2 each) to cover the 391 gb of extra space I would have needed. Eventually, my annual fee for MozyHome would have become $359.88. Yikes!
To be fair, it does seem skewed that I should be able to back up 121.32 gigabytes for the same fee as someone backing up 4gb of data. However, the new fees for MozyHome don’t really address that discrepancy. The base price that includes 50gb of storage is now higher than the unlimited plan ever was–$71.88 for an annual subscription (13 months as one month is “free”). So it’s not just people who use a lot of space who are being penalized: the casual user who is only backing up his or her e-mail, word processor files, and spreadsheets is suddenly going to pay $17.43 more per year for the same service he or she had before.
As services go, MozyHome is far from terrible, but it’s not terrific either. Uploads to Mozy are slow (granted, connection speed affects this to an extent), the software is extremely buggy and difficult to change settings, and it was never clear what Mozy would do with the data it had backed up from an external hard drive if that drive was not mounted the next time it went to back-up. I’m convinced it deleted 20 gb of uploaded files simply because I had an external drive powered down, although I’d be hard pressed to prove it. Mozy was completely acceptable when it offered unlimited storage for a bargain price, but with the new pricing, I’d recommend taking a pass.
What are the alternatives?
Immediately after getting the e-mail from Mozy that their prices would be climbing, I pulled up the Web site for Carbonite and found that their annual fee for unlimited storage space is much like the Mozy of the past: $54.95. Unfortunately, Carbonite doesn’t offer an option to back up external hard drives. Unless all of your files are on the same hard drive as your operating system, Carbonite won’t copy them to the server.
Additionally, while Carbonite offers unlimited storage space, they acknowledge that they slow down the speed of uploads to their server from users who have backed up more than 200 gb of data. In short, Carbonite won’t be replacing Mozy for backing up my data in the cloud.
I was looking at other options online and one service that seems to be a contender for filling the void that Mozy left is Back Blaze. It would appear to offer unlimited data storage for $5 per month and it can back up external hard drives. I may give it a trial run, but anyone who has experience with Back Blaze or any other the other online back up providers is encouraged to share their experiences in the comments below!
So what to do?
At the moment I’m going to depend on the two back up hard drives I rotate off-site, in addition to the hard drive I’ve recently set up as Networked Attached Storage (NAS) via a PogoPlug. While it isn’t the fastest NAS solution, the PogoPlug does have another trick up its sleeve: I can access the files from anywhere with Internet access!
I’ll have a tutorial of how I use PogoPlug, Microsoft SyncToy, and the Windows 7 Task Scheduler to keep my files backed-up across the network.