Introduction
As long as cameras have featured autofocus, photographers have complained about its shortcomings: sometimes autofocus (AF) is dead-on, sometimes it focuses ahead of the intended target, and sometimes it focuses behind it. These flaws have been described as front-focus and back-focus, respectively. The reason for the fault in AF is found in the manufacturing process: a camera body’s AF is calibrated to a “standard” lens. However, the lenses that are produced on the assembly line are made within tolerances for deviation. With their higher resolution, DSLR’s have revealed that the tolerances in manufacturing clearly are not as strict as demanding photographers would like.
A few years ago, Michael Tapes of the eponymous Michael Tapes Design was working to create a device that photographers could use to accurately determine if and what type of focusing problems they had with their equipment. Tapes’ vision was that photographers would have proof to show the manufacturer that what they were seeing in their images was not, in fact, user error but the result of equipment. Coincidentally, just as the LensAlign Pro was coming to market, camera manufacturers provided a means to correct front-focus or rear-focus problems in-camera with Autofocus Micro-Adjustments (referred to as AFMA in this review), often buried deep in the user menu. Canon was the first to announce such a feature in its 1D Mark III body, and Nikon quickly followed suit. Note that Nikon refers to this feature as “AF Tune.”
In the fall of 2010, while reviewing a LensAlign Pro on loan from Michael Tapes Design, it was hinted that a new product was coming that would replace the less expensive but discontinued LensAlign Lite. The new unit would offer the same rear-sighting ability as the larger LensAlign Pro, it would ship flat, and it would be more cost effective for the company to produce. In total, these would make it, at least on paper, a win for customers and for the producer. And it would bear a “Mark II” designation that seems quite popular among many manufacturers at the moment.
The LensAlign MkII functions much like its larger stablemate, the LensAlign Pro, so you may wish to refer to my review of the LensAlign Pro (Part One and Part Two) before continuing. Also, if you own a LensAlign MkII, you should consult the LensAlign resources page for documentation and the ever-useful distance tool.
First a prototype and then a final production version of the LensAlign MkII was provided to me by Michael Tapes Design to prepare this review.
Design
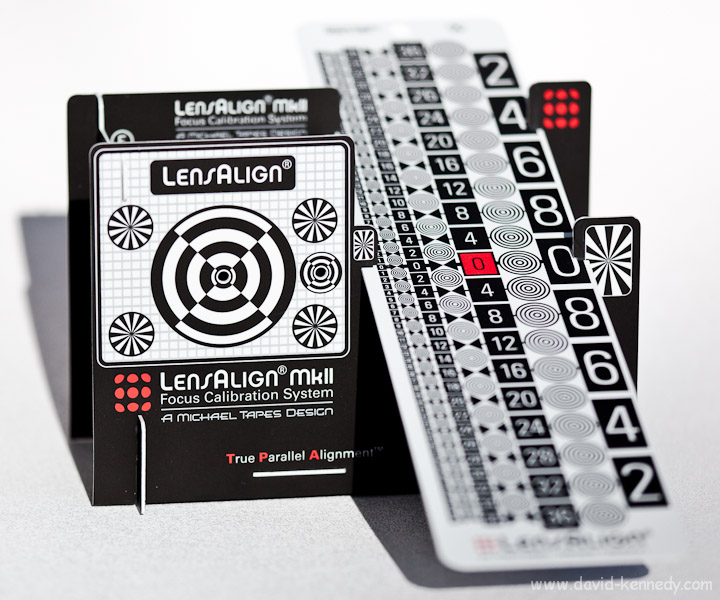
The LensAlign MkII is essentially a scaled down LensAlign Pro that weighs in at a mere three ounces. In comparison, the LensAlign Pro is almost four times heavier at 11 ounces. One of the most exciting elements of the design of the MkII is that it shares the rear-sighting system of the LensAlign Pro.
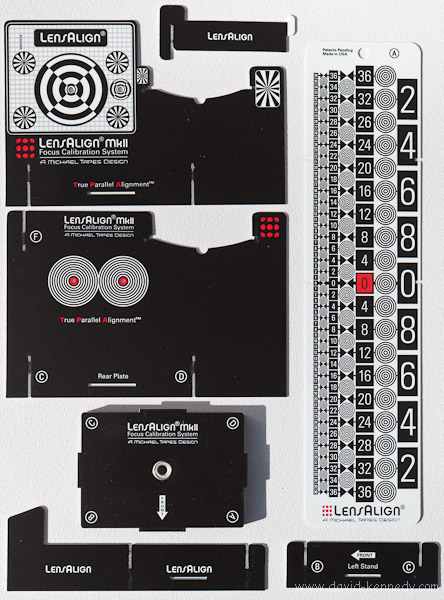
While offering the same accuracy as the Pro model, the MkII’s construction is radically different: the pieces are cut on a precision die and are assembled by the end user. The MkII ships (and can be stored) flat in seven pieces: a sturdy base made of extruded PVC with an aluminum bottom plate and quarter-inch tripod socket, a front and back plate with sights for both standard and macro lenses, and three parts that fit on the side to keep the front and back parallel all come to support the most important part of the unit: the ruler.
The components are made of thin polystyrene but they have a lot of “flex” to them; at first I feared if I didn’t put them together correctly they would crack, but they go together quite smoothly. And because the pieces can bend there’s little risk of their breaking during assembly–in fact, the ruler is designed to “bow” into place. I have taken apart and put together both the prototype and the production version multiple times without any problems.
Click through the photos below to see how the LensAlign MkII fits together:
Note that this sequence was made while I was using the prototype of the LensAlign MkII. The final production version is assembled in the same fashion.
The Ruler
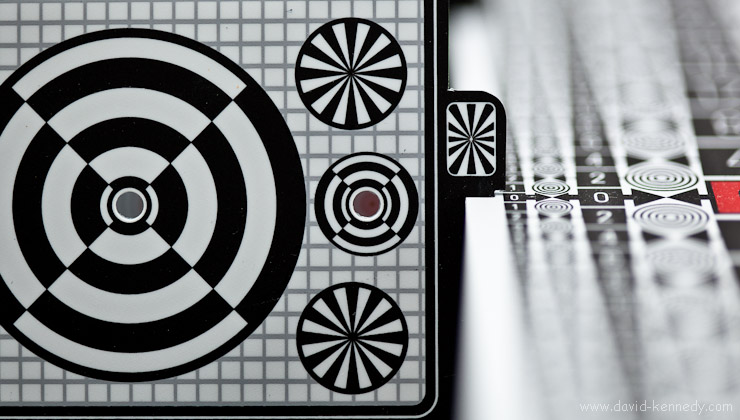
Since all of the other pieces come together to support the ruler, I would be remiss not to discuss it. The ruler on the MkII is an inch longer than the Pro’s, as well as half an inch wider, and double-sided with two different patterns. The first side has white numbers within black shapes, and the opposite side has black numbers within white shapes. My preference is for the white-within-black pattern, but users should try both to see which seems to be easiest for them to “read.” However, unlike the Pro, the ruler on the MkII is fixed at a 20-degree angle (Position Three on the Pro).
Initially I thought this might present more of a problem than it really does in practice. With the LensAlign Pro I will use the 20 degree position the most, but will occasionally switch to the 12.5 degree-angle when it seems too much of the ruler is in focus as the harsher angle limits can make the boundaries of the DOF “pop” a bit more. With the MkII the left-most row of numbers can sometimes be obscured by part of the front standard–this happens when calibrating wide angle lenses and macro lenses where the distance from sensor plane to LensAlign is two feet or less. However, the extra width of the MkII’s ruler means that there are more patterns to compare on opposite sides of the 0 Mark, so the difficulty in evaluating the smallest column of numbers is mitigated by comparing the two patterns immediately to the right, as in the photo above.
In Use
The LensAlign MkII has both a quarter-inch thread as well as four feet on the bottom for tabletop use. While it would be possible to use the MkII on a table, mounting it on a tripod offers far greater flexibility for making the face of the unit square to the camera. As discussed in the first part of my review of the LensAlign Pro, both the camera and tripod need to be positioned at a distance equal to 25 times the focal length of the lens (for instance, a 100mm lens should be calibrated from 2500mm away, or 8.2 feet). The camera and target are in alignment when the central AF sensor is aimed at the central view port on the LensAlign, with the bulls-eye perfectly centered within. For more details on the process of squaring the target to the camera, Tapes’ recent article about “Using True Parallel Alignment (sighting system) best practices” is a quick but good read.
For my testing of both the prototype and production MkII I attached Arca-Swiss style quick-release plates to make mounting on the tripod an easy affair. Another advantage of using an Arca-Swiss style quick release is that the LensAlign MkII or your camera body can slide from left-to-right within the channel of the quick-release clamp. This can make fine-tuning the position of the red AF target within the bulls-eye a snap and help avoid re-positioning a tripod when a minor adjustment is all that is necessary!
As I discussed in my review of the LensAlign Pro, there are three different ways of evaluating the autofocus performance and subsequent micro-adjustments:
- reviewing the images on the camera’s rear screen
- taking the flash card inside and reviewing the images on a computer monitor
- shooting tethered so that the images appear instantly on a computer.
I’ve found that shooting tethered is the most effective way of working with the LensAlign MkII, but it certainly has its share of disadvantages, among them glare off of the laptop screen when working outside and power and USB cables to avoid tripping over. Simply reviewing the images on the back of the camera may be one of the “fastest” means of calibrating the focus, and it seems to work well most of the time. However, there are times when two or three micro-adjustment settings all look “pretty good” on the rear screen. In a situation like that, importing the JPEG’s (no need to shoot RAW) into Photoshop to use the emboss filter can help to determine which is the best setting.
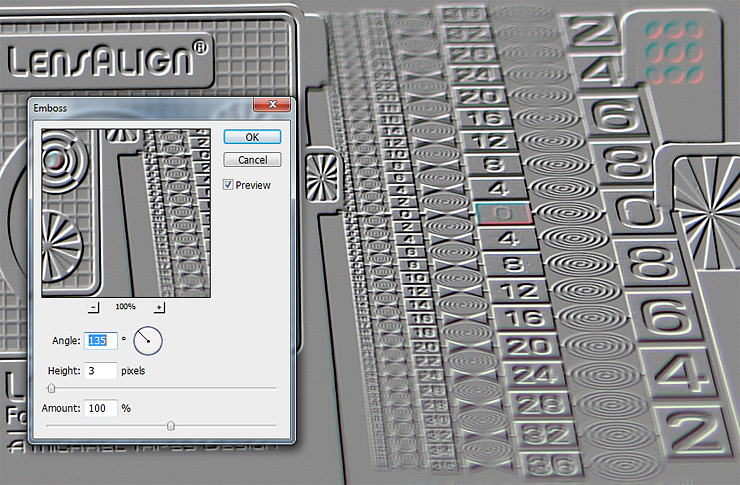
At the moment I cannot find a way to identify AFMA settings in a photograph’s metadata (evidently Canon DPP software can provide this information on Canon cameras). It is important to be mindful that the MkII does not have an “enumerator” like the Pro (there’s no built-in visual reference for which AFMA was used or how far apart the camera and LensAlign were in a given image), but a sticky note is an easy stop-gap!
My Method
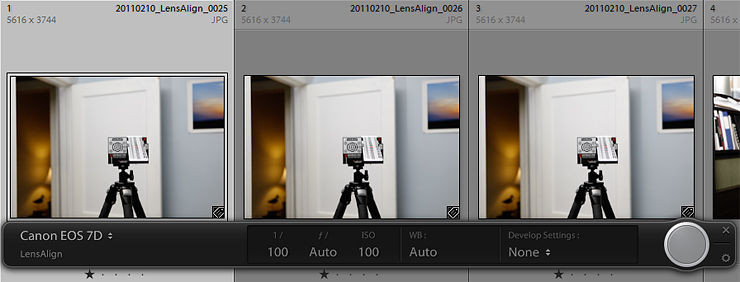
I prefer to work indoors, with the camera tethered to my computer when I’m calibrating lenses no longer in focal length than my 70-200mm zoom. I keep Adobe Lightroom open in tethered capture mode and review the JPEGs at 100% on my 24 inch monitor. A standard 16 foot tape measure will suffice for placing the camera and target at appropriate distances whenever working inside. If there’s diffuse light coming in through the window, I’ll use that. However, while I must be tripod-mounted to use the LensAlign, I prefer not to use slow shutter speeds.
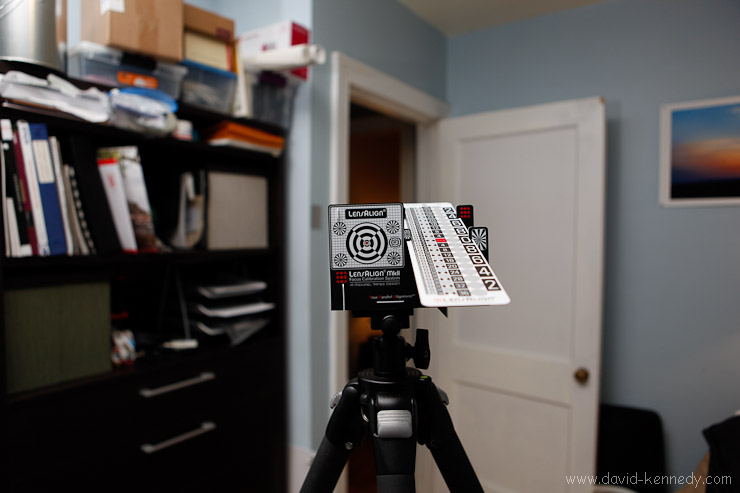
So, if my shutter speed dips below 1/100 second using available light I will set up an external flash and bounce it off of the (white) ceiling in my office. Note that the flash is there to help evaluate the ruler, not the front standard, so bouncing off the ceiling is ideal as it will evenly illuminate its surface . Just be sure not to overexpose the ruler!
While I set up a flash wirelessly using an ST-E2 transmitter and a single Canon speedlite mounted on a light stand (unless I’m calibrating the 7D, in which case I will use its built-in wireless flash control), mounting a strobe in the camera hot shoe and bouncing it off the ceiling will work.
When calibrating the AF with a lens longer than 200mm I wait for good weather and set up outdoors, grabbing a 50 foot reel tape measure on my way out the door. I have tried to work tethered with a laptop outdoors, but I’ve found the glare off my laptop screen to be unacceptable. Your mileage may vary as not all screens are the same! I typically try to work off of the camera’s rear screen, but sometimes I have to make a series of images (with sequential changes in AFMA) and take the flash card inside to scrutinize the images on my computer.
I recommend recording individual cameras and lenses and the best AFMA for each combination in a spreadsheet. Include the date that you perform the adjustment! As I discussed in the second part of my LensAlign Pro review, it would behoove users to calibrate their lenses before any major shoot, and then again a month later, and once again three months to the day of the original calibration. This is because the best AFMA for a given camera and lens may change with time–although the change need not be universal. This February both my 5D Mk. II and 1D Mk. III required a change in AFMA with my 70-200mm lens–I calibrated it with a LensAlign MkII prototype over Christmas–but the setting I had found for my 7D last fall with the LensAlign Pro remained “good.”
Compared to Lens Align Pro
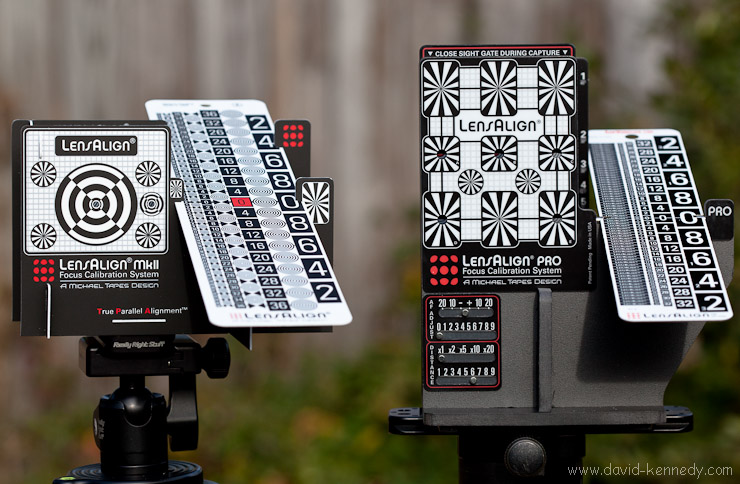
While it doesn’t exactly replace the LensAlign Pro, the LensAlign MkII offers the same ability to test and adjust the autofocus performance of DSLR’s as its bigger brother, for for $100 less. Of course there are differences between the two models, but how significant they are is ultimately up to the end user, but even their designer has a preference.
While speaking to me about the design of the new LensAlign, Tapes said: “Personally, I use the MkII: it’s smaller, lighter, easier.” Retail price aside, the fundamental differences between the MkII and the Pro lie in their construction, the ruler angles, the enumerator, and the Long Ruler Kits.
Construction:
The LensAlign MkII is made of thin, lightweight, and flexible polystyrene; the components are designed to be locked together and taken apart by the end user. The MkII is more portable than the LensAlign Pro, which is made of beefier extruded PVC, assembled at the factory and then laser-tested for accuracy before shipping. (It should never be taken apart since it may no longer be accurate after being reassembled.) To travel with the MkII, simply put its pieces in a rigid envelope and drop it in the bottom of a suitcase with folded pants or other clothes. I simply cannot recommend air travel with the LensAlign Pro.
Rulers & Angles:
The improved, wider ruler pattern makes up for the fixed 20 degree angle on the MkII. On the LensAlign Pro I only use the 20 degree and 12.5 degree positions any ways. Additionally, the MkII’s ruler has a matte surface whereas the Pro’s ruler is highly reflective, making the MkII easier to work with in sunny situations.
Enumerator
This might be the only thing absent on the MkII that makes me nostalgic for its predecessor. The enumerator on the LensAlign Pro can be very helpful when comparing changes to the AFMA on a computer. However, a pad of sticky notes and a pen will do the same thing, if nowhere near as elegantly.
Long Ruler Kits
An optional accessory, the Long Ruler Kit on the LensAlign Pro creates a four-foot ruler. Because the material is nowhere near as rigid, the MkII’s Long Ruler Kit will feature only a two-foot ruler. The idea behind the Long Ruler Kit is that a photographer may set up the target at a greater distance than the recommended 25 times the focal length of the lens. Tapes explains that this can be beneficial for photographers with super-telephoto lenses who often photograph their subjects from great distances and therefore would prefer to calibrate from healthy distances. Not having used one of these kits I cannot speak to their functionality, but I will say that so far I have not felt the need for one in calibrating lenses up to 1000mm in effective focal length (500mm with a 2x TC). If the idea of a four-foot ruler appeals, there is only one choice.
Conclusion
In my review of the LensAlign Pro I wrote that “The good news is that even if LensAlign is the only practical tool available, it’s a good one.” This holds true for the LensAlign MkII: no other company makes a tool that offers the accuracy of the LensAlign family of products. DataColor didn’t try very hard when they came up with the Spyder Lens Cal, and no one else has stepped up to the plate. The LensAlign Pro is a great tool, but an expensive one both for the consumer and the manufacturer. The LensAlign MkII is every bit as accurate and more gentle on consumers’ wallets. Yet, I know there are those who are going to ask whether the product is “worth” the $80 expense.
I think the LensAlign MkII a no-brainer as it helps a bag full of expensive lenses produce the absolute sharpest images they possibly can. Personally, I never knew that the 16mm end of my 16-35mm zoom could resolve the level of detail that it does now that I’ve used a LensAlign; it’s like having an entirely different–and better–lens.
In a world full of hundreds of accessories that are priced in the range of $50-$100, the LensAlign MkII might just be the best value on the shelf. Highly Recommended!

[…] that shipping internationally was a problem for the company, so he created a new stablemate, the LensAlign MKII. The new product sells for $80 and offers much of the same functionality as the LensAlign Pro in […]
[…] of reviews online that pan the lens for a myriad of issues (many of which can be resolved with focus calibration) the reality is that this lens makes really beautiful images. Bokeh is soft and creamy…it […]